Is there anything more luxurious than having a space in your home dedicated to getting you in the vortex of feeling and looking good? We think not. Anyone can create a makeup room—after all, it’s a space wholly devoted to you, yourself, and thee—and it can take whatever form you choose. Whether you’re working with an entire room or a corner in your bedroom, we’ve got tips on how to transform any area of your home into a glamorous makeup room.
What is a makeup room?
A makeup room (also called a vanity studio, beauty room, or makeup studio) is a customized area in your home where you can do your makeup and skincare routines and focus on yourself. If you’re in the business of making YouTube videos (or you want to be), having a dedicated space for filming your makeup application tutorials is essential. You can set up your makeup studio in the spare room you never use, but an empty room isn’t necessary to create one—a large walk-in closet, a corner of your bedroom, or the bathroom can all be transformed into a vanity studio.
Makeup rooms are a stellar spot for other self-care activities, too. Meditation, yoga, finding inspiration for your lifestyle blog, writing in your bullet journal—your makeup room is a place for you to do anything that makes you feel good. Beauty rooms can even moonlight as your home office or craft space.
Decorating your makeup room
Consider how much space you have for your makeup studio, and make a list of what supplies you’ll need. Are you going to be transforming an entire room or just painting and decorating a corner? Do you already have a vanity table, or will you be buying one? Carve out a budget for your makeup room so you don’t end up spending more than you can spare.
There are as many decor styles for your makeup room as your imagination can conjure up. A monochrome look in all pink or red is always striking and unique—or maybe you’re a minimalist, and a white beauty room with a single pop of color is more your speed. Think about what you want the style of your studio to be.
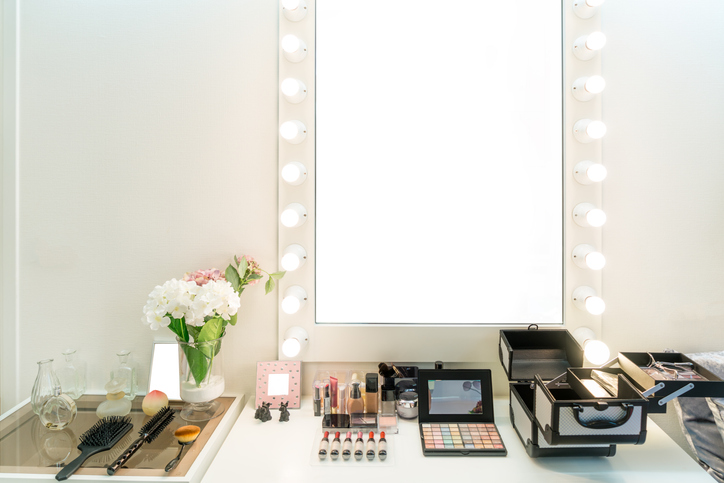
Below is a beauty room shopping list to give you an idea of some of the supplies you might need. Use this to create a checklist for your own room. If you’re on a tight budget, see what you can source second-hand.
Furniture
- Vanity
- Chair or stool
- Couch
- Mirror(s)
- Storage chest
Decorative items
- Vase with flowers or feather plumes
- Trinket dishes
- Decorative trays
- Framed wall art
- Personal photos
- Candles
- Room divider
Tech supplies
- Camera
- Microphone
- Video editor software
- Ring lights
Makeup tools and accessories
- Makeup lights and lamps
- Skincare fridge
- Makeup organizers
- Beauty blender
- Jade roller
- Eyelash curler
- Makeup brushes
Choosing a vanity mirror
No makeup studio is complete without a vanity mirror. Putting on makeup without a mirror might make for a funny video, but it probably wouldn’t result in the best look. Vanity mirrors are a bright canvas to look into while you apply your makeup, and they provide a focal point in your beauty room. Choose from these types of vanity mirrors:
Smart mirror
Smart mirrors have an electronic display behind the glass. These mirrors use smart technology to analyze your skin and give you information about your fine lines, dark circles, and other skin conditions. Some smart mirrors are connected to Amazon’s Alexa and will tell you about the weather, give you news updates, and play your favorite music while preparing your makeup.
Integrated mirror
These kinds of mirrors have lights built into the mirror. Integrated mirrors give you even more clarity while doing your makeup, and they make for glowing centerpieces in your beauty room.
Double-sided mirror
These are smaller mirrors, usually circular, that have two sides. One side gives you a normal view of yourself, and the other side magnifies your reflection — perfect for precise eyeliner application or plucking your eyebrows.
Full-body mirror
Full-body mirrors are wonderful for checking out your whole outfit and taking selfies. Some of these mirrors can get quite pricey but paying little extra beats having to stand on the edge of the bathtub to get a head-to-toe glimpse of your outfit before you go out.
Choosing a ring light
Ring lights are the creme de la creme of beauty studio lights. They illuminate the subject (you) in a soft, direct light that minimizes shadows. These factors make ring lights an excellent lighting choice for taking videos, photos, and applying makeup. You can also find plenty of lighting tips to create the perfect setting for your makeup room.
LED is king
LED lights are the best choice for ring lights because they last longer and are brighter than normal lights. They don’t get hot like fluorescent lights do, which means you don’t have to worry about your LED ring light overheating if you have it on for a while.
Light temperature
Light temperature doesn’t measure how hot the light gets. Rather, it refers to the color temperature. Do you want warm, golden light, or cool, white light? Some ring lights can mimic natural daylight.
Size it’s important
Common ring light sizes are 12, 14, and 18 inches. The 12-inch version is great for headshots, but if you’re taking videos, choose a larger size. Bigger ring lights produce a broader, softer light that’s better for video production.
Using your ring lights to take photos and videos
Place your camera on a stand in the center of your ring light. This will ensure an even distribution of light and produce the best, most professional-looking photos and videos.
Makeup conservation 101
Class is in session. Whether you shop exclusively high-end, frequent your local drugstore, or a little bit of both, you’re probably spending a lot of money on makeup products. Proper care and storage of your makeup and tools will extend the life of your coveted favorites, meaning you’ll spend less money on replacements. Here are a few hot tips on how to get the most out of your makeup.
Clean your makeup brushes
Over time, makeup brushes get coated in the caked-on product, body oil, and bacteria. Ideally, you should clean makeup brushes once a week but let’s be honest, few of us have time for such frequent cleanings. Aim to give your brushes a good deep clean at least twice a month.
Set up a brush-cleaning station with these supplies:
- Brush cleanser, mild shampoo, or dish soap
- A mug or bowl
- A towel
How to clean your makeup brushes
Squeeze a dollop of your chosen cleanser into the bowl or mug, and fill it with warm water. Swirl your brushes in the soap/water mixture, then massage the bristles with your fingers to loosen the product buildup. Rinse the brushes under room-temperature water, and gently squeeze the water out. Lay them flat on a towel to dry.
Extend the life of your makeup
How do you prevent your makeup from breaking, crumbling, and drying out before you’re finished with it? Use these simple tricks to make your makeup go further.
Get a makeup bag
Instead of tossing your lipstick and eyeliner into your bag or backpack for touch-ups, invest in a cosmetics bag for on-the-go use. Choose one that fits inside your regular bag so that your makeup is protected while you’re out and about.
Soak mascara in hot water
Is your mascara drying out? Try getting a bowl or cup of hot water, then let your (tightly closed) tube of mascara soak in it for five minutes. This should soften your mascara enough that you can squeeze another week or so out of it before you’ll need to buy a replacement.
Scrape out the last bit
Even if you can’t squeeze any more product out of the tube, that doesn’t mean it’s empty. Cut open the tube, and scrape out the remnants. You will be surprised to see how much product is left.
Mix your foundation with moisturizer
A good foundation can be crazy expensive. Try mixing your foundation with a little moisturizer before applying it to your face. The tinted moisturizer won’t be as intense as the foundation on its own, but it’ll still provide good coverage while conserving your makeup.
Store products in your skincare fridge
Most makeup and skincare products will last longer in a cold environment. Foundations, moisturizers, eyeliner pencils, eye cream, sunscreen, self-tanner, and perfume all benefit from having space in your skincare fridge.
How to organize your makeup
Can’t find that pink eyeshadow you really need for the e-girl look you’re doing? Or maybe your favorite liquid liner rolled off your vanity and into oblivion. Organizing your makeup keeps it safe and makes it easier for you to find what you need when you need it. Read on for some organizing tips.
Go vertical
If you have a lot of makeup, consider getting a tall organizer with drawers. These are slimmer than a dresser and have smaller drawers—perfect for storing makeup jars, tubes, and eyeshadow palettes.
Use clear acrylic storage containers
A clear storage container leaves no room for confusion — but it’s plenty roomy for all of your makeup products. These containers are fairly inexpensive and come in various sizes, so you can get one to store just your lipgloss and another for the products you use every day.
Label everything
Grab a pad of sticky notes or a roll of washi tape and your trusty Sharpie. Write down the contents of each drawer — eyeliner, makeup palettes, lipstick — label it all. This will help you keep each organizer’s contents straight, and you’ll spend less time searching for that special item.
Get creative
Use empty candle votives or vintage glassware for makeup brushes and eyeliner pencils. A jewelry box is a great way to store your nail polish, and coat hooks make storing items like scissors and eyelash curlers a cinch. Spice rack organizers are an innovative solution for storing foundation or skincare products.
Give your makeup passion a space of its own with a dreamy makeup room. Creating a vanity studio that offers an area devoted to your makeup and skincare routine is a great place to have some me-time, hone your skills, and take killer videos and selfies.


