When it comes to skincare, natural homemade options are usually the best to maintain healthy skin. With an ever-growing interest in taking care of our appearance and well-being and going for sustainable beauty alternatives, DIY crafts such as soap making have become more popular than ever. Anyone can enjoy such creative and relaxing activity, from children to seniors. Soap making allows for the use of different ingredients, shapes, sizes, and even methods for the making process. Each soap can be used for multiple purposes and can benefit the skin in different ways. Additionally, some soap recipes are intended to be more flexible for those who are looking to experiment with colors, crazy shapes, or simply have some fun while doing crafts at home with the family. If you’re looking to start a soap making business or you just want to learn a new hobby, in this Q&A you will find some great tips and ideas from the experts that will surely help you in your soap making journey.
How can I make my own melt and pour soap bar?
Making your own melt and pour soap bars is a great way to dip your toe into soap making. For the best results, keep things simple at first.
Start with a high-quality melt and pour soap base, cut the base into small chunks, and heat in the microwave in a glass container according to the package directions. Stop heating when there are still a few lumps left and stir until smooth.
I said to keep things simple, but that doesn’t have to mean boring. You can color your soap using liquid soap dye (not candle dye or food coloring!), cosmetic grade mica pigments, or biodegradable glitter; and use skin-safe fragrance oils or essential oils for nice smelling soap.
I recommend measuring out your fragrance oil (by weight) before you start melting your soap but it’s easier to add drops of liquid colorant directly into the melted soap.
Stir your colorants and fragrance into the melted soap and then pour into a clean mold. Silicone baking or candy molds work really well for melt and pour soap. The hardened soap is really easy to pop out and it will show off all the details that you love in the molds.
If your soap is looking bubbly around the edges you can fix that with a quick spritz of 99% Isopropyl Alcohol.
For a basic batch of soap I like to start with 16 oz of melt and pour soap, my favorite base is from Nature’s Garden and contains Mango butter, and once melted I add .2-.3oz of fragrance oil, 4-8 drops of liquid coloring and a 1/8-scant 1/4 tsp of glitter.
This will give you about 6 decent-sized soap bars that are perfect for frequent hand washings and make great gifts!
-Alecia at Chicken Scratch NY
How can I involve my kids in soapmaking?
Involving your kids in the soap making process is easy. You will want to use a melt and pour soap base for safety reasons, though there are a lot of great soap recipes that you can make using melt and pour. You can let the kids help to gather supplies for soapmaking, and if they are old enough, they can help to cut the soap base. Kids can add the essential oils or fragrance oils to the soap, and then even pour the melted soap base into the molds. Another thing that kids can do is to help choose the soap colors!
-Melissa Hagan at Outnumbered 3 to 1
What’s the easiest soap making method for beginners?
The best soap making method for beginners is definitely Melt and Pour (M&P). In fact, it’s the first technique I teach new soapmakers. The other methods of soap making require sensitive measurements and are a much more involved process. If you can use a microwave, you can make melt and pour soap!
Melt and pour soap is essentially taking a premade soap base and making it your own. Once you’ve melted it down, you can add a variety of soap dyes, fragrances, botanicals, essential oils, and many different aesthetic flourishes. You can also use whatever molds you like, giving you plenty of opportunities to get creative!
I know many soap makers who prefer the melt and pour method over all others. It’s very fast, super cheap, and affords ample room for creativity. There are lots of things you can do with melt and pour that you just can’t do with other methods.
Cold Process Soap (CP), for instance, always makes an opaque bar of soap. You also must be careful what you try to embed within CP soap. Saponification, the chemical reaction that turns liquid oils into lovely soap, will often burn your embeds, turning them black. Whereas you can get melt and pour soap base that is completely clear. It also won’t ruin your lovely rose petals or lavender buds.
I like to think of melt and pour as a starting point. It gives you a taste of what soapmaking has to offer you, without the need for too many resources and too much of your time. Then when you catch the soapmaking bug, you can build upon the skills you’ve learned making melt and pour soap. Soon you’ll be whipping up cold and hot process soaps like no tomorrow!
-Angela Wills at Savvy Homemade
How can sustainable and ethical practices be ensured in the process of soap making?
Our entire operation follows sustainable and ethical practices. First of all, we strive to always be transparent and authentic. Skincare consumers are understandably confused by the greenwashing techniques employed by some of the big players in the industry. We tell it like it is — we source locally or through Fair Trade whenever possible and craft all our products at our wind-powered Microsoapery. By operating with renewable energy, using biodegradable ingredients, and packaging with recycled, recyclable, dissolvable, or biodegradable materials, we live up to our sustainable commitment – creating safe, gentle, hypoallergenic, sulfate-, phthalate- and paraben-free natural skincare products that are safe and effective for you, and beneficial to the planet. By being a Public Benefit Corporation working towards B-Corp certification, sustainable and ethical practices flow through our policies as well as our actions.
The Spinster Sisters line has expanded from soap to bath, body, face, aromatherapy, and hair products. How we make them, what we make them with, and how we package them are all the ways we ensure people can trust that we are meeting those ethical and sustainable standards.
When making soap at home, you can follow some of these same practices. If you can power your home with renewable energy that’s a great start! Choosing equipment like mixers that are energy efficient is another sustainable choice. Obviously, you’ll want to find the best natural ingredients you can get from ethical and even local providers. If you’re going to be packaging your soaps up for friends and family, you can choose recycled or upcycled materials for that, too! Like wrapping them up in decorative and reusable fabrics. What a fun gift idea, too!
Perhaps most importantly, be kind to everyone you encounter in this process and have fun with it!
-Kelly Perkins at Spinster Sisters CO
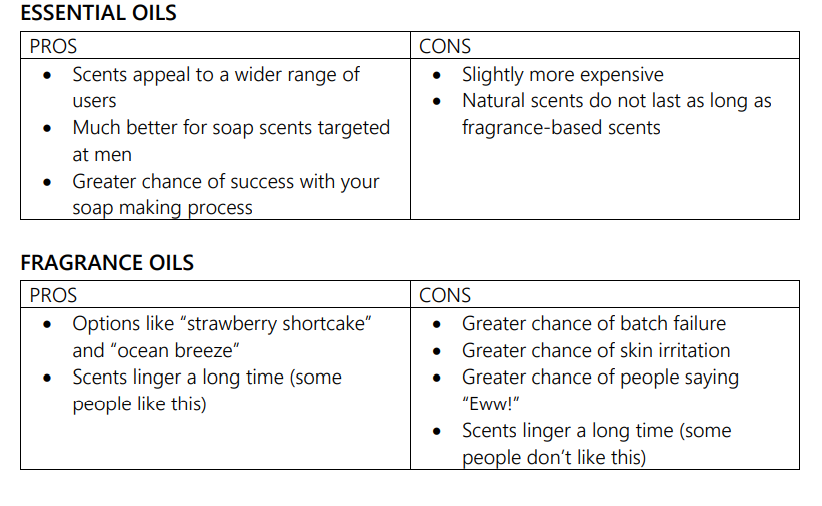
Is it better to use essential oils or fragrance oils for soapmaking?
One of the classic soapmaking questions (and classic debates)! In a soap formulation, essential oils and fragrance oils provide the primary scent. Even though soap has multiple characteristics (lather quality, color, texture), the scent is the dominant one, so this is an important question.
As a quick summary, essential oils come directly from plants, and fragrance oils are synthesized. For many people (including those of us at Botanie Soap), this distinction makes all the difference for products we use on our bodies, but let’s look instead at using them in soap making without the question of natural vs. synthetic origins.
When you choose ingredients and formulate soap, there are two goals:
- Success of your batch
- Success of the user experience
Success of your batch:
Soapmaking is a chemical reaction. Proper formulating requires planning and deliberateness, and proper saponification requires care and attention to detail. In other words, just making good soap is already complicated enough. But when working with fragrance oils, you also have to consider the following fails: Seizing, Ricing, Separating, Oozing, Weeping. These do not occur with essential oils. A few essential oils (such as thyme and clove) can cause fast saponification, but not a seize like some fragrance oils cause. If the success of your batch is a primary goal, why not just use natural essential oils and make a complicated process a bit simpler?
Success of the user experience:
We had a farmer’s market booth for 10 years and heard the following points week after week. First, people with sensitive skin or those that deal with allergies, psoriasis, or eczema tend to have increased irritation from fragrance oils but aren’t bothered by essential oils. (And you’d be surprised to learn how many people fit this description.) Second, there is a qualitative scent difference between plant extracts and synthetic scent bases. When given the choice, people just like essential oils better. Week after week, we heard this from both customers and fellow vendors who would complain about other booths with fragrance oils soaps. If you share or sell your soap, these are important considerations.
At the end of the day, making soap with essential oils vs. fragrance oils is a personal choice. But if you want your soap hobby or small business to be successful, then essential oils are the way to go for successful batches and user experience.
Summary
-Tim Iudicello at Botanie Soap
How can soap making be incorporated into DIY crafts for kids?
Making melt and pour soap is just so easy, that your kids can easily help stir melted soap, pour melted soap, combine essential oils for the perfect scent, and add labels to your soap! My kids also love using soap colorant to decide what the color of the soap will be! I’ve had my kids help me more than once make these custom homemade soaps that they end up giving to their grandparents and teachers for gifts.
-Maura White at Happy Deal – Happy Day
How can you make soap out of kombucha?
Making soap with Kombucha is great for two reasons – it helps you use up your extra SCOBYs and it leaves your skin feeling clean, silky, and soft!
To prepare your kombucha for soapmaking, first, you’ll want to test the pH of your kombucha so that it is between 3.0 and 3.5. If it’s higher than that, you’ll need to let your kombucha ferment for a bit longer. Once the pH is within that range, blend your extra SCOBY with a bit of kombucha tea in a blender to create a smooth, watery consistency. Then, you’ll want to drain the liquid out through a fine-mesh strainer. Follow the normal cold process method for soapmaking until you blend the strained SCOBY with the lye after it has cooled. Next, you’ll add the lye and SCOBY to the still liquid oils. The rest of the process is the same as any standard cold process method for soapmaking.
We find the process to be quite simple and straightforward, and if you’ve mastered general soapmaking and kombucha brewing, it’s a fun and easy way to combine both hobbies. The only challenge is making sure your kombucha falls within the correct pH range so that it properly reacts with the rest of the formula. Many beginners use pH strips, but eventually, most home kombucha brewers can tell when it’s ready by taste. For more details, check out our Kombucha Soapmaking blog post.
-Hannah Crum at Kombucha Kamp
What are the best ingredients for a moisturizing soap?
Though homemade natural soaps can be super basic, you can always enrich them and raise them to a more luxurious experience by including ingredients that your skin will love. Specifically, when we are talking about making moisturizing soaps, the best things you can add to them would be nourishing oils and butters. These are my favorites:
Shea butter is one of the most popular ingredients for dry and sensitive skin, often added to all kinds of bath and body products. It is moisturizing and nourishing, and it will add hardness and a silky feel to the soap bars.
Jojoba oil is not a real oil at all, but a liquid wax. It conditions and deep-moisturizes the skin, which makes it perfect for all skin types, but especially dry skin.
Coconut oil is great for soap making because it adds hardness to the bars, plus it has natural cleansing properties. This oil is rich in nourishing fatty acids and vitamins E and K.
Grapeseed oil is anti-inflammatory and full of antioxidants. It works well on sensitive and even oily, acne-prone skin, as it gently moisturizes without clogging pores. It works best in combination with other moisturizing oils.
Avocado oil is rich in vitamins A, B, D, and E. It is super moisturizing and has mild cleansing properties. Avocado oil adds creaminess to the lather and conditions the skin. It is especially recommended for dry and mature skin.
You can also add small amounts of your favorite essential oils, to enhance the scent and add a bit of aromatherapy benefits to your soaps.
-Jovana R. at Be Spotted
What are the best ingredients a natural soap for sensitive skin needs?
Soaps crafted for sensitive skin needs should contain gentle and nourishing ingredients. When it comes to carrier oils most nourish & hydrate the skin, some good examples are sunflower & olive oil. Also incorporating kinds of butter such as Shea butter can help to provide extra moisturizing properties.
One additive that comes to mind immediately is oatmeal, which has natural saponins and it’s known to be very soothing for the skin. Aloe Vera is also cooling, soothing, & anti-inflammatory. Both Aloe Vera and oatmeal can help to provide an extra layer of protection for the skin and help to deal with moisture, keeping the skin hydrated. Two of my personal favorite herbs to use for sensitive skin are chamomile & calendula, they are both gentle enough for baby skin and they are known to help with wound healing and skin regeneration.
-Terran Lewis at Herb’N Eden
What are the main benefits of making handcrafted soap using traditional, “old-fashioned” methods?
Why you may ask, should I buy or make handmade soap when I can get more soap for less money at the grocery store?
Generally, the commercial soaps carried at most chain stores, etc. are full of chemical additives, additives that not only dry out your skin but can lead to rashes and other irritations. This is not only because of the synthetic additives in the soap but also because most soap companies take the glycerin out of their soap.
The commercial soap bars that line most grocery stores’ shelves are actually synthetic detergents. While that’s great for your dishes, it’s not very good for your skin.
Handmade Soap is soap in its true, pure form. It gently cleanses away excess oils and bacteria but doesn’t strip your skin of its natural oils.
If the commercial soap company does put in some natural ingredients along with its synthetic ones, they do so in such small quantities as for it to be inconspicuous in the soap. Its main purpose is to catch the eye of the consumer and give them the illusion that this soap is more natural. f you read the ingredient labels though, the soap is still primarily made with synthetic ingredients.
Using commercial soaps over time leaves your skin dried out, or way too oily, and feeling like it’s never clean. Natural handmade soap, that only uses natural ingredients, can restore the moisture to your skin, while still getting you clean. You will be amazed at the difference!
Handmade soap is a cleanser made with simple ingredients that are good for your skin. In the handcrafted soap making process, oils and fats are combined with lye to produce soap and glycerin. Some people may question the use of lye in handmade soap. The fact is that all soap is made with lye. What needs to be made clear is that once the process of saponification is complete, the lye and oil molecules have combined and chemically changed into soap and glycerin.
All bar soaps are made with lye, however, when made correctly, there is NO LYE remaining in the final bar of soap. Whether your soap is manufactured by large corporations or smaller handcrafted soap makers, the above rings true, regardless.
Cold Process soap needs to slowly “cure” over time.
We allow our soaps to naturally air cure for six to ten weeks and up to 2 years.
During the first two weeks of curing, the saponification process is completed.
“Saponification is the chemical reaction that occurs when fats or oils (fatty acids) come into contact with lye (a base). Saponification literally means “soap making” from the root word, “sapo”, which is Latin for soap. The by-products of the saponification reaction are glycerin and soap.”
As the soap continues to cure, most of the water used in the recipe evaporates. The curing process ensures a milder, harder, longer-lasting bar,
-Elis at Natural Handcrafted Soap
What are the benefits of incorporating herbs into homemade soap?
Herbs are powerful and carry incredible properties that our skin can benefit from such as antibacterial, anti-inflammatory, healing, or anti-aging. These could be used in skin conditions such as eczema, psoriasis, acne or just to make our skin radiant, smooth, and healthy.
If you want to treat your skin naturally and save money at the same time, herbs are a major contributor to a healthy natural skincare routine that works!
I love to make a triple action of herbs in soaps to achieve a potent homemade solution. First I select one herb or combination of herbs depending on the skin type and condition one wants to treat. Then I replace distilled water that is normally used in homemade soaps with a herbal infusion of the selected herb. Secondly, I make infused oil from the herb of my choice to replace the ordinary oil that makes up the oily part of ordinary soap. Lastly, I carefully select an essential oil that boosts the scent and properties of the soap. In the end, I love to use the selected herb for the decoration to highlight its scent and medicinal properties.
My entire site is about herbs that I like to use, not only in soaps but also in creams, oils, lotions, or salves to enhance the skin or hair. Moreover, we guide you on the herbal journey to implement herbs in your daily life to enhance your meals and make your own natural remedies.
–Vladka at Simply beyond herbs
How can I choose a melt and pour soap base?
When choosing a melt and pour soap base, think about what you want from your soap. Presumably, if you’re going to the trouble of making your own soap, you want to avoid unnecessary harmful or chemical additives, so first things first, check the ingredients. Go for a base with high-quality, skin-safe ingredients and avoid anything that contains parabens or Sodium Laureth Sulfate (SLS).
Next, think about what properties you want the soap to have. Need something that’s highly moisturizing? Go for a goat milk base or goat milk and honey. Need something that’s gently exfoliating or good for sensitive skin? Choose an oat soap base or go with shea butter for creamy, moisturizing soap delicate enough for sensitive skin, then add your own oats to the mix for exfoliation. And if it’s fun (but healthy) soap you want to create, such as glitter soap or soaps embedded with toys, herbs, flowers, and similar, go for a clear (or colored but transparent) glycerin soap base.
–Katy Willis at Real Self Sufficiency
What are some of the ways you can use homemade liquid castile soap?
Liquid castile soap is very useful for making a myriad of household cleaners. You can buy liquid Castile soap at most grocery or hardware stores, or make your own (see I Bastardized Our Soap—Make Your Own Liquid Castile (Bastille) Soap). Here are some ways I use homemade liquid Castile soap in my home:
Liquid Dish Soap
Ingredients:
10 oz. water
1 oz. liquid Castile soap
Directions: Mix in dispenser bottle and use for handwashing dishes.
Eyeglasses Cleaning Spray
Ingredients:
4 oz. isopropyl alcohol
4 oz. cup water
1 drop liquid Castile soap
Directions:
Combine in a small spray bottle. Spray on glasses lenses and wipe with a clean, lint-free towel.
Notes:
Do NOT use on contact lenses or in your eyes!
Granite-Safe Cleaning Spray
Ingredients:
1 ¼ cups 190 proof Everclear or 99% isopropyl alcohol
¾ cups water
or
2 cups 70% isopropyl alcohol or 140 proof Everclear or vodka
and add
1 Tablespoon liquid Castile soap
¼ teaspoon (18 drops) tea tree oil
1/8 teaspoon (9 drops) essential oil of choice (or use scented liquid castile soap)
Directions:
Combine all ingredients into a 16-oz. spray bottle.
Notes:
Safe on granite and stone but test on other surfaces before using. Do not drink and keep out of reach of children.
Outdoor Squeegee-Off Window Cleaner
Ingredients:
1 gallon water
1 teaspoon liquid Castile soap
1 cup vinegar
Directions:
Combine ingredients in a bucket. Apply to windows with a sponge and squeegee off!
All Surface No-Rinse Floor Cleaner
Ingredients:
16 oz. warm water
3 drops liquid Castile soap
3 drops peppermint essential oil
3 drops lavender essential oil
Directions:
Mix together in a spray bottle. Spray onto the floor and mop off. Let dry. No need to rinse.
-Cindy Thompson at Trimazing!
What are the essential supplies I need to make soap at home?
Safety Gear:
You’ll need goggles and gloves because when making soap you’re dealing with lye. You’ll also want to wear long sleeves and an apron. If lye water or raw soap batter touches your skin, it will burn and can be very dangerous.
Digital Kitchen Scale:
Soap recipes use ounces or grams, not volume. Since you’re basically doing chemistry at home, precision is important. Measuring with volume just doesn’t work. Look for a scale that has a tare feature so you can zero out the weight of your container easily.
Stick Blender:
Technically, you can whisk up a soap batter by hand, but it’s best to use a stick blender. A food processor or regular won’t work because of the risk of splashing (remember, the soap batter has raw lye in it).
Soap Mold:
You can use a box lined in parchment paper if you really want to, but I recommend a basic 10-inch mold or 12 cavity bar mold for your first batch. Keep an eye on the batch size of your recipe.
As you become more interested in soap making, you can expand your collection of molds. You can find silicone molds that imprint designs, solid wooden molds, and individual bar molds.
Lye:
Lye typically comes in either flakes or little bead-like pellets. If you want to make cold-process soap, you need lye.
Oils:
The oils you choose are the building blocks of your soap recipe. Popular choices are olive oil, coconut oil, and almond oil. When blended with lye water, they turn into soap
Colors and fragrances:
These are optional, but help your soap feel more personal. There are hundreds of fragrances and colors designed specifically for soap making.
-Katie Shaw at Heart’s Content Farmhouse
As with any homemade craft, there are virtually no limits to what you can do if you let your imagination fly and follow a little guidance from the experts. Don’t be afraid to try something new along the process or add new ingredients to the mix to discover wonderful results. Even the craziest ideas can be handcrafted. Plus, your skin will thank you for choosing to go organic!


