In the hustle and bustle of daily life, finding time to prepare healthy and delicious meals can be a daunting task. That’s where the magic of meal prep comes in. In this guide, we’ll unravel the expert meal prep secrets that can transform your kitchen routine from chaotic to seamless. Let’s delve into the world of culinary efficiency and discover how a little planning can go a long way.
Understanding Meal Prep Basics
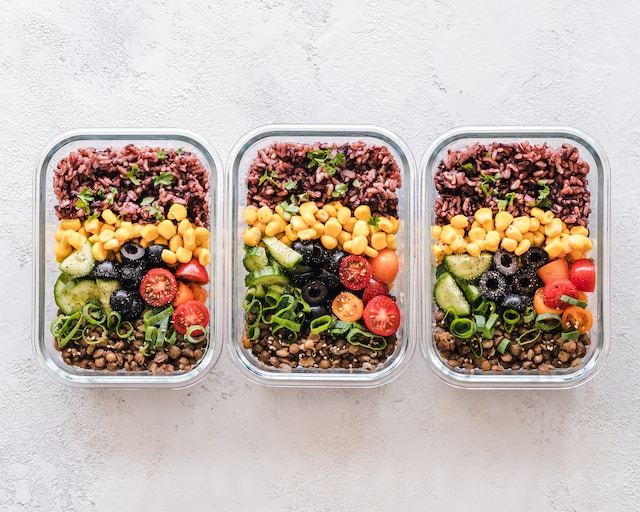
Meal prep is more than just a trend; it’s a lifestyle that can revolutionize how you approach cooking. At its core, meal prep involves preparing ingredients or entire meals in advance. The benefits are multifaceted — from saving time during busy weekdays to ensuring you maintain a balanced and nutritious diet. By dedicating a small amount of time upfront, you set yourself up for success throughout the week.
What are the benefits of meal prepping?
Meal prepping is a great way to help you stay on top of a healthy diet. Setting aside time to cook a healthy dinner or pack your lunch during the week can be difficult if you have a busy schedule. Meal prepping allows you to get that hard work of making nutritious food out of the way in one swoop and sets your week up for success! While it does take some extra time to prep, later in the week, when you’re tempted to reach for fast food or sugary sweets, you will have your healthy meal prep ready to go to combat those cravings. Additionally, if you struggle with portion sizes, meal prep can help with pre-measuring your desired portions for each meal. If you like to count your macros, you can measure your carbs, fats, and protein for each meal ahead of time. Meal prepping does take some extra planning at the start of your week, but in the long run, it will make your healthy diet feel like a breeze!
-Claire Jenkins, MS, ACSM-CEP, RYT-200 at Sunny Health and Fitness
What are the advantages of structuring meal prep with specific planning, shopping, and preparation days?
Add some structure to your kitchen and meal prep routines. Set a day of the week to do each step of the meal planning, prepping, and preparing. You can order groceries on Friday, have these delivered on Saturday, and do meal prep on Sunday. Your meal prep includes making a meal kit for each meal. This step makes it easier to prepare. A meal kit is a tray or bin with all the ingredients needed to prepare that meal. Because each step is assigned a day of the week, you are more likely to accomplish each part of the process. You are less stressed making decisions about what is for dinner by preparing beforehand. Having meals planned saves you money and keeps you on the health plan that you had as a goal.
-Ellen Delap at Professional-Organizer.com
Planning for Success: Culinary Strategies from the Pros
Now that we grasp the basics, let’s explore the strategies used by culinary experts to plan meals effectively. These professionals understand the delicate balance between nutrition, flavor, and variety. They create meal plans that are not only good for you but also tantalize your taste buds. Learn the art of crafting versatile meal plans that adapt to your tastes and dietary needs.
How can you create versatile recipes to use throughout the week?
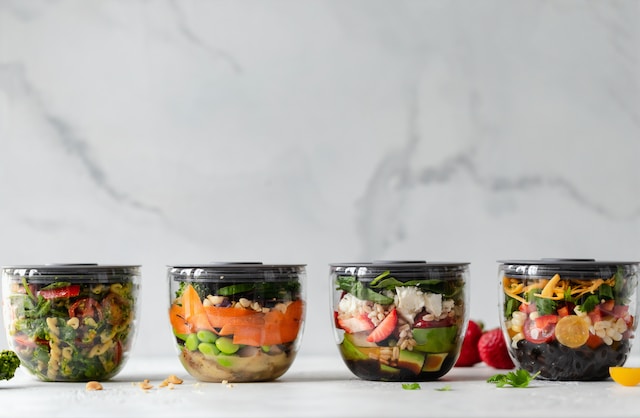
An easy practice to creating versatile meals throughout the week is to look through your pantry and pick two items that need using up. For example one legume and one grain. Let say you picked black beans and quinoa. Batch cook those two things on Sunday. On Monday you could create Buddha bowls adding fresh veggies and a peanut sauce. The next day you could make tacos out them. The following day you could toss with greens and a dressing adding other fresh veggies making a hearty salad. Then, the next day you could use any left over to add to a soup. It’s a great way to meal plan, and using what you already have is affordable and just feels good!
-Sylvia Fountaine at Feasting at Home
How can individuals create versatile recipes that can be repurposed or adapted throughout the week?
When people hear I have a recipe website, they always exclaim, “Wow, you must eat gourmet meals every day!”
Nope.
We lead a busy life, and I’m all about shortcuts, easy meals, and logical cooking. What do I mean when I say logical cooking? Here are some examples:
- Use one pan instead of two, or one bowl instead of three.
- Planning ahead just a bit to make one meal stretch into two (or even three!).
- Not leaving weird, odd amounts left in packages.
- Knowing that things don’t have to be perfect.
Dinner does not have to be complicated to be satisfying and delicious. One of my favorite things to cook is a whole roasted chicken. It’s economical, makes your house smell amazing while it cooks, and makes a perfect hearty Sunday night dinner. Sometimes I even make two, so I have more leftovers! Leftovers can be used for nearly anything – some of my favorites are BBQ chicken nachos, chicken tortellini soup with pesto, and avocado chicken salad.
I also love to prep some quinoa and roasted vegetables to make easy, quick bowls all week long. Add some of that roasted chicken and a drizzle of honey mustard vinaigrette for an easy and delicious lunch or dinner.
We utilize the concept of repurposing all the time with our meal plans. In one of our recent meal plans, you roast a couple of extra chicken breasts and repurpose them into a southwestern bbq chicken salad (you can check out that meal plan here).
I don’t always love eating leftovers, but I do love repurposing food to get the most out of my work in the kitchen. You just need to be creative! Think of making a one-pot pasta, and then adding some cheese to the leftovers, tossing it in a casserole dish, and baking it for a new twist on it the following night. I love brainstorming and a challenge, so it’s always fun to think…how can I use this in a new way? I hope you are inspired as well!
-Rachel Gurk at Rachel Cooks
What are essential kitchen tools and equipment for efficient meal prep?
There are a few essential kitchen tools and equipment for efficient meal prep and effortless meal making that I cannot live without. Let’s start with the two most essential for dinner, a garlic press and a good Santoku knife. I love a garlic press because at least a few times a week, you need to throw a little garlic into something, and fresh garlic is always the way to go, but it’s a hassle to mince. A garlic press makes it easy to load 1-2 cloves in, press down, and instantly you’ve got garlic ready for cooking without a single knife chop.
Speaking of knives, that’s my number 2 pick! A good knife is LIFE CHANGING! Meal prep will go so much faster and easier with a great knife, and this version is one that is big enough to use for all kinds of jobs, like chopping meat and other large items, but small enough to handle a mince or dice.
Last but certainly not least would be a plastic and wood cutting board. Plastic for meats and wood for everything else!
-Carrian Cheney at Oh Sweet Basil
What are some expert tips for choosing and preparing ingredients in advance?
Food prep is one of the most beneficial things you can do for your family during busy weeks. While I sometimes prep entire meals to reheat and eat during the week, I also spend much of my time prepping meal ingredients. This includes things like rice and quinoa, roasted vegetables, cooked chicken and steak, sauces, and more. Having these ingredients prepped and on hand means I can quickly assemble them into meals during the week. I can make a bowl of rice, chicken, and roasted vegetables, use the cooked chicken and homemade enchilada sauce to make a pan of chicken enchiladas, use cooked chicken and vegetables to make soup, etc.
You can also choose to prep things that can be eaten for breakfast or snacks. A batch of muffins or an egg bake can be used for a quick breakfast, or you can make a batch of smoothies and freeze them in mason jars for a quick snack.
-Lindsay Livingston at The Lean Green Bean
What are some recommendations for freezing and reheating meals?
Let’s look at a few tips for freezing and reheating meals.
Use the Right Container: Make sure containers are freezer-safe and airtight–think mason jars, glass storage containers, and heavy-duty plastic containers. Be sure to check that your containers are designed to freeze without cracking.
Cool Before Freezing: Allow meals to cool to room temperature before you put them in the freezer. This will help prevent ice crystals from forming and will keep your food tasting fresher.
Label: You may not remember what that mystery meal is in a few months, so label containers with the dish name and the date it was made.
Freeze Flat: You can freeze meals in freezer-safe baggies, but if you do, lay them flat until they’re frozen. This saves space and will help them thaw more evenly.
Reheat Safely: When you’re ready to use your freezer meals, thaw them in the refrigerator overnight. Or, use your microwave’s defrost setting if you’re in a hurry. Always reheat your food to a safe temperature, usually around 165°F.
Add Flavor: After reheating, you might find that a dash of fresh herbs, a squeeze of lemon, or a dollop of sour cream can freshen up the flavor of your reheated dish.
With a little planning and these tips, you can decrease food waste, save money, and enjoy the convenience of ready-made meals from your own freezer.
-Teresa Britton at MomsWhoSave.com
What are some effective grocery shopping strategies for optimizing meal prep efficiency?
Effective grocery shopping is pivotal for streamlined meal prep. Here are some strategies to optimize your grocery trips and set the stage for efficient meal preparation:
Strategic Meal Planning: Think of it as sketching out your fitness goals, but for your taste buds. Planning your meals provides clarity and purpose. Begin drafting a weekly menu and transform this into a detailed shopping list. Pro tip: Align your list with the supermarket’s layout. It’s like having a GPS for your cart—saving time and streamlining your shopping experience.
Rotate Your Menu: While consistency can be comforting, culinary variety is the spice of life. Establish a rotation of two to three weeks for your favorite meals. This approach ensures a fresh experience at every meal while eliminating the redundancy of frequent planning.
Timing is Key: The ambiance of a grocery store varies dramatically throughout the day. Early mornings or late evenings are typically more tranquil, providing an optimal environment for a focused shopping session. Selecting these off-peak hours can transform your grocery trip from an annoying chore into a therapeutic experience.
Celebrate Seasonal Produce: Discover the natural magic of Mother Nature’s menu! Eating with the seasons not only benefits your health but also your taste buds and wallet. Experiment with in-season produce to create mouthwatering dishes that burst with flavor. Plus, it nudges your inner chef to get creative.
Embrace Technology: In this digital era, many grocery stores extend the convenience of online shopping, complemented with curbside pickups or home deliveries. This tech significantly saves time and keeps those impulse buys (yes, looking at you, chocolate chip cookies) at bay.
By integrating these five strategies into your grocery shopping routine, you’ll be better poised to enjoy a week of diverse, nutritious, and stress-free meals.
-Lisa Stovall at TotalWellness
The Synchronized Dance of Meal Prep and Cleaning

A clean kitchen is a canvas for culinary creativity. Experts emphasize the intimate connection between meal prep and maintaining a spotless cooking space. Discover efficient cleaning hacks that seamlessly integrate into your meal prep routine. Proper appliance cleaning is a crucial aspect, ensuring your tools function optimally. Consider the added protection of a home warranty, providing peace of mind in case of unexpected breakdowns.
What are some quick and effective strategies for cleaning as you go during meal prep?
As a busy mom and full-time food blogger, I know how discouraging it can be to finish up a meal and then be faced with a kitchen that’s a total disaster. That’s why cleaning as you go is essential.
The absolute best way to do that is to marry a man who’s a good cleaner! For everyone else, here are some of my top strategies:
- Keep your garbage can handy: The first thing I do when getting ready to cook, whether for meal prep or just a weeknight dinner, is to take the garbage can out of the cabinet. Keep it out right next to your prepping area. This way, you can immediately discard packaging, scraps, peels, etc., before they build up.
- Prep your sink: Keep a few inches of warm, soapy water in the sink. That way, as soon as you’re done using a utensil, cutting board, mixing bowl, or so forth, it can go right in the water to start soaking. This is especially important when using sticky ingredients like honey, peanut butter, or mayo.
- Organize ingredients: Before turning on that stove, have all your ingredients measured, cut, and ready to go. Not only does this reduce the likelihood of missing a step or ingredient, but it frees up time during the cooking process, which can be used to clean up.
- One-Pot/Skillet meals: If you can, go for recipes that use a single pot or skillet. Less cookware means less cleaning. And let me tell you, dishes like one-pot pasta or a skillet stir-fry are excellent for meal prep!
- Wipe spills ASAP: Spilled some sauce or dough on the counter? Wipe it up immediately before it has time to set and becomes a real pain to clean.
- Use parchment paper or foil: Solid pan meals are one of my favorite meal prep options. Always line your baking sheet, or any other baking dish, with foil or parchment paper for easier cleanup later.
- Clean during downtime: Last but certainly not least, make use of your downtime. Got something simmering or baking? Use this time to wash some of the prep tools you’re done using. I know it can be tempting to kick up your feet, but trust me, you’ll be glad you didn’t when your meal is ready, and your kitchen is spic and span!
By incorporating these strategies, you’ll find that cooking becomes a more streamlined and enjoyable process. And remember, a tidy kitchen is the first step to crafting delectable, can’t-get-enough recipes!
-Alpana Beiser at GypsyPlate
How can one maintain a clean workspace during meal prep to avoid cross-contamination?
First, make sure you start your cooking space with a clean workspace. I know it’s annoying, but I do everything with a baby on my hip, one-handed, and can still manage to do it, then so can you. My biggest advice/ efforts I can put forward are clean workspace, washing hands, and utilizing different tongs for raw vs cooked food. Even if it feels a bit annoying, it’s a crucial step that sets the stage for safe cooking adventures.
Separating raw and cooked foods is like the golden rule of meal prep. I learned this when I worked in hospitality for many years, all the different colors for different foods. They often rely on color-coded chopping boards – an incredibly handy nifty trick. You can also have designated boards for different tasks, like one for fruits and veggies and another for proteins. It’s all about creating a system that suits your style.
As a nurse, I’ve learned that proper handwashing is second nature. But not everyone masters this art. Remember the COVID era when we all had to brush up on handwashing techniques? Well, it’s a big deal in the world of meal prep too. After handling raw meat, washing your hands thoroughly is a must. Avoid the temptation to wipe your hands on a tea towel before washing; it can lead to contamination.
Believe it or not, even the tap can be a culprit in the cross-contamination game. If you touch raw meat and then turn on the tap with your fingers before washing, you risk spreading those sneaky contaminants. If possible, opt for a tap that you can operate using your forearm or elbow. Alternatively, use one hand for raw meat tasks and the other for tap.
Here’s a lesson I learned the hard way – never mix up your tongs! When dealing with raw and cooked items, for instance, meatballs, having separate sets of tongs is a game-changer. Reserve one set exclusively for raw meat and the other for cooked food.
These are just some simple steps to ensure you do not cross-contaminate in the kitchen and create a clean workspace simultaneously. It’s all about cultivating good manageable habits that keep your culinary creations deliciously safe. Happy cooking!
-Jaide at Stay at Home Mum
Are there any time-saving hacks for daily kitchen maintenance to prevent a buildup of dirt and grime?
Two recent time-saving hacks my wife and I implemented in our kitchen have been utilizing splash guards when frying and liners in our shelves and drawers. First, splash guards are inexpensive silicone funnels that wrap around your frying pan to build a protective temporary wall that catches virtually every oil splatter when frying. Since silicone is easier to wash and clean than the stove and counter, this addition was a no-brainer. We often fry potatoes for french fries and chicken cutlets. The oil used to splatter everywhere, making surfaces grimy and nasty. If we didn’t clean it immediately, that dirt and grime became a pain to clean. In fact, it required a deep clean session and lots of elbow grease. Silicone splash guards are game changers–take my word for it. The beauty of silicone is that it can last a long time and is super easy to clean with warm water. Most silicone parts can also be tossed into the dishwasher.
The other time-saving hack we swear by is using plastic or vinyl liners in our kitchen drawers and cabinets. Wiping liners down with a wet sponge every so often–monthly works for us–is quick and easy. Before liners, cleaning the wood inside the shelves and cabinets was difficult. Oil and crumbs would stick to the wood and get caught in the crevices. Over time, not only does the wood get damaged, but smells can start to result that might attract unwanted friends like fruit flies or, worse, mice. The key with liners is to accurately measure the size of your shelf or cabinet surfaces and to neatly cut the liner to match those sizes. It’s not too difficult, and it’s only a one-time endeavor. Additionally, you really only have to add liners to your most used areas. For example, if you have higher cabinets that only hold your special plates and cups that are rarely used, liners aren’t necessary there.
Lastly, we have created the Kitchen SinkShroom anti-clog strainer to help families keep their kitchens clean and clog-free. It catches leftover food and debris before those nasty bits can clog your drain. The Kitchen SinkShroom also prevents dirty dishwater from backing up with its raised center mushroom part. Keeping the inside of your sink clean is now a breeze, too.
-Solyman Najimi at TubShroom
What are effective strategies for dealing with stubborn stains and residue on kitchen surfaces and utensils?
When you’re preparing your meal, you’ll be working with many ingredients, including sauces and spices, on your kitchen counters. Inevitably, while doing all this prep, some drips or splatters can occur, and if you’re not careful, some of these messes can stain your kitchen countertops and/or your utensils, food storage containers, and more.
Prevention of stains is most effortless, so before you begin your meal prep, lay out some type of cover on your counters where you’ll be prepping or transferring any sauces or potentially staining ingredients into containers. This could be as simple as laying out a few kitchen towels to place your food containers on or placing a large tray or flat baking sheet down to use as your flat surface instead of directly laying items on your countertops.
As for preventing stains in the containers themselves or utensils used for making your food, if you are making meals where the sauces have been known to stain plastic food storage containers, such as curries or tomato-based sauces, you can wipe a small amount of cooking oil on the inside surface of the container, which helps create a protective barrier to prevent stains. Another possibility would be to ditch the plastic containers altogether and instead use glass containers which don’t take on stains easily.
Although an ounce of prevention is worth a pound of cure, inevitably, these stains can still occur. Once you notice discoloration or splatters from staining sauces, act as quickly as possible to wipe them up. The longer the sauce sits, or if it’s dried before you start the clean-up process, the more difficult it can be to remove, although not always impossible.
Soak utensils in warm or slightly hot water to loosen any residue, or a wet paper towel laid onto the dried-on mess to loosen from a countertop. Once you’ve wiped away residue, if there is staining left, soak utensils in a small bowl with a tablespoon of chlorine bleach (you can use oxygen bleach if you prefer, although it doesn’t always work quite as well), and it should remove most stains.
For your countertop, you can make a paste of powdered dishwasher detergent and water, and rub it onto the stained area, letting sit for a few minutes, and this will also remove most stains. With countertops, be especially careful if you have any type of stone counters, such as marble or granite, as any type of stain removal like this can cause etching or remove the sealant, so you may need to use a stone-safe cleaner instead.
-Taylor Flanery at Household Management 101
What is the recommended frequency for deep cleaning the kitchen?
Kitchen deep cleaning is essential for maintaining a clean and hygienic cooking space. But how often should you undertake this more intensive cleaning regimen?
Deep cleaning goes beyond daily chores and focuses on hard-to-reach areas, hidden grime, and thorough sanitization and disinfection. It prevents the buildup of grease, dirt, bacteria, and mold fostering a safe and inviting cooking environment.
The ideal frequency for deep cleaning depends on various factors:
- A deep clean every three to six months is a good rule of thumb for most households.
- If you frequently cook or entertain, consider more frequent deep cleanings to address grease and food splatters.
- Seasonal deep cleaning can keep your kitchen fresh and well-maintained throughout the year. This could be done three to four times a year.
- Larger families may require more frequent deep cleaning to manage the increased mess.
A kitchen deep clean covers key areas:
- Appliances: Degrease ovens, stovetops, microwaves, and refrigerators, paying attention to burner and vent areas.
- Cabinets and Cupboards: Wipe down exteriors and handles and clean interiors as needed.
- Countertops: Disinfect and scrub thoroughly, focusing on sink and cooktop areas.
- Floors: Vacuum and mop, getting into corners and under appliances.
- Sink and Faucets: Scrub sinks and faucets, removing limescale and stains.
- Exhaust Fan and Hood: Clean filters and wipe down fan blades and surrounding surfaces.
- Backsplash: Degrease and clean tiles or surfaces.
- Light Fixtures: Dust and clean light fixtures, replacing any burnt-out bulbs.
- The Areas between Countertops and Stovetops: Many food and liquids fall through the space between the countertops and your cooking surfaces. Pull the range or stovetop away from the wall if possible, and clean the floors.
Maintaining a clean kitchen between deep cleaning sessions is equally vital. Regular chores like surface wiping, dishwashing, and sweeping should be incorporated into your daily or weekly routine to reduce the need for deep cleaning too often. In fact, it is highly recommended that you leave no dirty dishes in the sink after the day’s last meal.
The recommended frequency for deep cleaning your kitchen can vary based on your cooking habits, household size, and cleanliness preferences. Finding the right balance ensures that your kitchen remains a clean, safe, and welcoming space for food preparation and family gatherings. Deep cleaning enhances aesthetics and fosters a healthy environment for you and your loved ones.
-Andy Agrawal at Weekend Maids
What steps should be taken to clean and disinfect the refrigerator and freezer after storing prepared meals?
Cleaning and disinfecting your fridge and freezer is like giving them a much-needed spa day, but we’re using disinfectant wipes instead of cucumber slices. 😄
Step 1 Empty the Space: Take out all the prepared meals, condiments, and mystery containers you’ve been avoiding. Place perishables in a cooler with ice to keep them fresh.
Step 2 Unplug and Defrost: While most modern refrigerator/freezer combos automatically defrost themselves, don’t skip over this step if that’s the case for you. Unplug the fridge and freezer. If there’s ice build-up, now’s the time to let it melt.
Step 3 Remove Shelves and Drawers: Take out all removable parts. This is like dismantling a Lego castle, but way easier to assemble. I like taking pictures with my phone to remember exactly how everything was.
Step 4 Soapy Water Wash: Fill a sink or bucket with warm water and a squirt of dish soap. Scrub all the removable parts and wipe down the interior walls. For stubborn stains, baking soda is your best friend.
Step 5 Disinfect: Wipe down all surfaces with a disinfectant solution. You can use a store-bought one or make your own with 1 part bleach to 10 parts water. Just don’t mix bleach with ammonia; we’re cleaning, not creating a science experiment gone wrong.
Step 6 Dry and Reassemble: Dry all the parts thoroughly before putting them back. A damp environment is a playground for bacteria; we’re not hosting that party.
Step 7 Plug Back In: Time to bring your fridge and freezer back to life. Plug them in and adjust the temperature settings to their optimal levels.
Step 8 Restock: Place your prepared meals and other items back in, organizing as you go. Maybe even label the shelves if you’re feeling all extra about yourself.
Step 9 Regular Maintenance: To keep your fridge and freezer in tip-top shape, aim to repeat this process every 3-6 months. Your future self will thank you.
And there you have it! Your fridge and freezer are now so clean they’re practically auditioning for a cleaning commercial. Happy homemaking!
-Mary Beth at The How-To-Home
Organizing Your Way to Kitchen Efficiency
An organized kitchen is a game-changer in the world of meal prep. Experts swear by strategic storage solutions, decluttering techniques, and tips for maximizing space. Whether you have a spacious kitchen or a cozy nook, optimizing organization enhances the overall meal prep experience. Create a kitchen that works with you, not against you.
How do you organize your kitchen for effective meal prepping?
When it comes to organizing my own kitchen for meal prepping, I’ve found that a little strategy goes a long way. First, I always start by decluttering. Clearing out items I rarely use gives me the space and freedom to work without feeling cramped. Music helps, too! I’ve set up my kitchen in functional zones: one corner for chopping, another for cooking, and a special spot where I mix and bake. This zoning method has been a lifesaver, making each task feel more natural and efficient.
Another thing I’ve learned over time is the value of leveraging all the kitchen tools at my disposal. Using the Instant Pot, slow cooker, oven, stovetop, and casserole cooker simultaneously can drastically speed up meal prep. With all of these going at the same time, you can efficiently prepare multiple dishes at once, cutting down on overall cooking time and maximizing productivity in the kitchen.
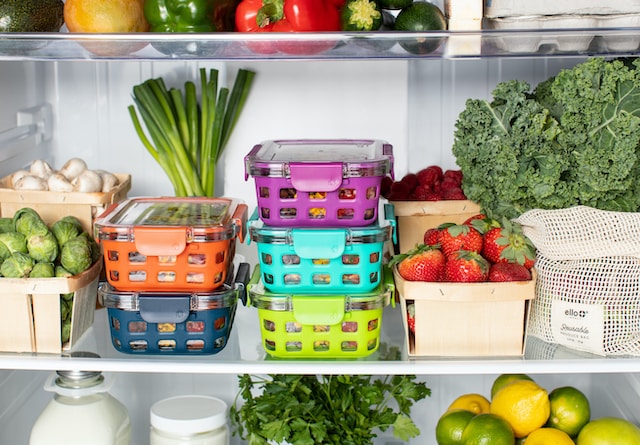
Storage is another area I’ve given a lot of thought to. I’ve invested in some top-notch, clear containers. They’re not just practical; being able to see what’s inside at a glance is incredibly convenient. And I’ve gotten into the habit of labeling each container with its contents and the date I prepped it. It’s a simple step that helps me keep track of freshness and reduces any guesswork during the week. I’m also a big fan of the First-In, First-Out system. By using my oldest ingredients first, I ensure that everything I whip up is as fresh and tasty as possible.
Before I even start my meal prep, I take a moment to plan out my meals for the week. It gives me a clear roadmap of what needs to be done and lets me batch-cook certain staples. This little bit of foresight saves me so much time and effort throughout the week. In the end, having an organized kitchen and a clear meal prep plan makes my cooking sessions a breeze. It’s all about finding what works best for you and sticking to it.
How do you organize your fridge for effective meal prepping?
Having an organized refrigerator may sound unnecessary, but it actually makes life easier. Keeping your fridge in order makes every step of the meal-prepping process smoother. Here are a couple of tricks you can use in your refrigerator:
- Establish zones in your refrigerator for various types of items. For instance, condiments on the door, large bottles on the second shelf, vegetables in one drawer, and fruit in another. Don’t be afraid to adjust your shelves to accommodate your regularly used items.
- Add structure, such as fridge bins, to keep small items together. These are handy for things like cheese sticks, small fruit, condiment packets, etc. Bins act like extra drawers in the fridge, allowing you to easily reach items from the back. They are also simple to remove and clean.
- If you enjoy canned beverages, use a dispenser to keep cans easily accessible. A dispenser with a flat top allows you to stack items on top and take advantage of vertical space.
- For jars and bottles, a turntable can be helpful. Instead of shifting items around, you simply twirl, grab, and go. Again, these can be quickly removed and cleaned if anything spills.
- Use clear containers for storing food. Square/rectangular containers help maximize the utilization of your space. They are handy for leftovers and also for items you chop in advance. Clean and prepare ingredients when you have time (e.g., during naptime or on the weekend), and then stack them for quick retrieval when it is time to cook.
- Add labels to help everyone remember what goes where. Dissolvable labels can be convenient on food storage containers because they are easy to wash off. If you want to label shelves or the door area, use a more durable label, such as one from a label maker.
Don’t forget to clear out your fridge regularly. A recurring time slot, such as the first of the month or Friday afternoons, helps you remember to complete this task. Periodically go through, remove anything old, expired, or inedible, and quickly wipe down the shelves.
-Seana Turner at The Seana Method
As we wrap up our journey into expert meal prep secrets, envision a kitchen transformed. The time spent in thoughtful planning, efficient cleaning, and strategic organization pays off through stress-free cooking and healthier meals. These expert tips aren’t just for seasoned chefs; they are for anyone looking to simplify their kitchen routine. So, armed with these secrets, step into your kitchen, and let the magic of meal prep elevate your culinary experience. Here’s to delicious, stress-free meals and a kitchen that works as efficiently as you do!


