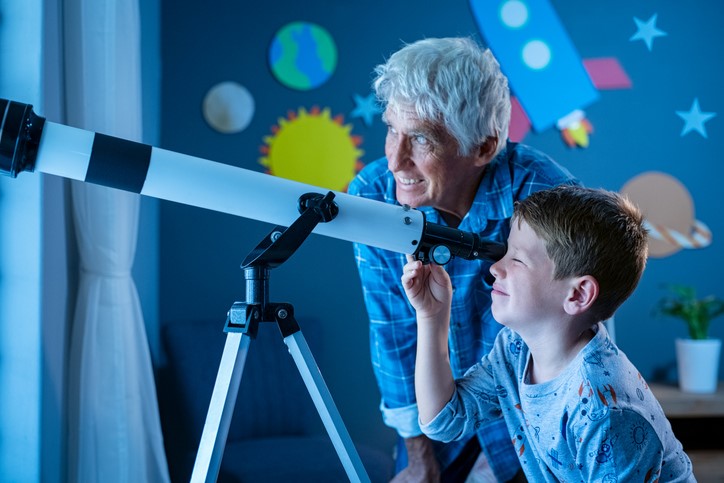
There’s no time like the present to introduce your child to the fun of gazing up at the stars. It’s a great family activity and it doesn’t take a lot of effort, expertise, or money to accomplish. You can ignite in your child a lifelong love of astronomy and science and give them a new way of looking at the universe and our place in it. Who knows: your child may become a future International Space Station astronaut!
Kids have a natural fascination with the stars above, and even if you’re also a beginner stargazer, it’s an easy and rewarding hobby to start and maintain. Stargazing doesn’t require a big investment – just look up on a clear, dark night. With the help of a telescope or binoculars, though, you can see even better the many stars, constellations, the moon and its phases better, planets, and even meteor showers.
Why stargaze?
Children naturally look up at the stars and wonder what’s out there. Don’t let that sense of fascination disappear in the hustle and bustle of the world and the pull of technology like video games. Colorful, shimmering auroras, constellations and their histories, comets, and meteor showers, along with planets and moons have held the interest of scientists and enthusiasts for centuries.
With just a little bit of homework and learning on your own part, you can encourage your child’s interest in astronomy. You can all travel the Milky Way and beyond with only a star chart or app and your eyes.
Tips to get started from home
To help your children develop a love of stargazing, you’ll need to foster some knowledge yourself. Become familiar with the solar system, planets, major constellations, and more so that you can discuss these with your kids. It’s also fun to learn these things alongside your children. Your local library and the internet have lots of resources available to help you on your journey. We have some more tips to help you set up great stargazing opportunities.
Location, location, location
The best star-gazing location is a dark one, obviously. If you live in a rural area, you’re in luck: lights from street lamps, homes, apartments, and other buildings won’t interfere with your sighting of stars and more above you. You should be able to step outside, look up, and enjoy. If you live in a city, you’ll need to find a location where your view of the night sky isn’t blocked by the light around you or obstructed by buildings and trees.
The glow from light pollution in cities may obstruct your view. This could come from the overall city lights or it could be localized, line-of-sight light interference from sources like street lamps and porch lights on your own block. Both of these light pollution situations obstruct your view of the nighttime sky.
You may need to scout a location that’s away from the city lights, street lights, and other things that keep you from seeing the stars well.
If going to a great stargazing destination isn’t in the works, try stargazing from a balcony, looking through a skylight, or going up to your attic and looking out the window, Your back yard or your front steps with the lights turned off is also a possibility.
If you live in an apartment building, ask management if you can have access to the roof. Especially if it’s a high-rise, this will keep trees and other buildings from obstructing your view. It may also put you above the level of street lighting.
If stargazing from your home is not a workable situation, consider wide-open city parks or beaches if you live near the water. Bring a suitable tent if you want to make this an overnight experience. Always keep safety in mind.
Stargazing equipment
Make sure you and your children are properly clothed for your stargazing adventure. Since it’s at night, you might get cold, or you may be swatting mosquitoes. Wear several layers if you’re in a cooler climate.
There are some supplies you may want to buy to enhance your stargazing experience. While you can stargaze with just your eyes, you may want to invest in a telescope or binoculars. You don’t need to buy expensive ones – you can even look online to see if you can find a used telescope or pair of binoculars.
A good introductory telescope, with a 4″ to 5″ aperture, may cost between $100 and $200. Binoculars are less expensive and may be just right for those starting out. Once your child shows more interest and passion for stargazing, you can look into investing in a telescope. Here are some of the 2020’s best telescopes for beginners.
Whether you’re starting with binoculars or a telescope, make sure the eyepieces have “eye cups” that block the light from the corners of your eyes. These let you see into the sky much better.
Download star map apps on your phone that show you exactly what you’re looking at. These awesome apps include Star Chart (for iOS or Android). Install the app and then point your phone’s camera to the sky – the app tells you the constellation or the stars you’re looking at.
There may be stargazing gatherings in your area, often called star parties. People bring their own telescopes and meet at a location to all gaze at the sky, sharing their passion for stargazing along with knowledge. This would be a great way for your kids to learn from others with more stargazing knowledge than you have. Where are these stargazing parties? Look on StarDate.org.
Don’t forget your computer. You can download cool astronomy software, giving you a visual to teach astronomy through star-mapping programs that show the night sky near where you live, by dates and latitudes. Other software shows and charts planet positions and moon phases for dates which are quite useful for planning your stargazing outings.
According to Wikihow, Celestia is a good freeware, three-dimensional astronomy program that lets your kids tour stars and the solar system with an easy destination search function. The program also lets you browse the Milky Way and other solar systems and read about them. You kids can even make their own short, animated tours with Celestia.
Another great astronomy site and phone app is Google Sky. It operates using global positioning satellites. Just point your phone where you’re gazing at the sky and the app tells you the constellation.
To help your stargazing experience, you can take your phone with star apps or your computer with star-mapping software along with you as you head out at night but double-check how well your computer, tablet, or phone can handle inclement weather like cold temperatures or moisture.
If your children are younger, find books that can help you teach your child about astronomy in simple language with clear pictures and concepts their young minds can relate to. Look for a book to keep at home and a smaller reference book you can take with you outside at night as you gaze upward. wikiHow recommends Howard Schneider’s “Backyard Guide to the Night Sky” as a good field guide.
Prepare for your night out in the elements as you’re star-gazing. Bring some kind of cushioned mat to make it more comfortable to stand, sit, or lie down. Consider bringing other items of comfort, like a sleeping bag, folding chair, or camping chair. If you’re trekking to your stargazing location, you’ll want lightweight, easy-to-carry items, a flashlight to light your way, and snacks and water. You could even try a mosquito net if you’re stargazing in summer or in hot climates. Poke a hole in the mosquito netting to fit over the telescope.
Blocking the light around you is an important aspect of stargazing. If you don’t have natural barriers, you can take your own along, fashioning it with cheap PVC piping and black fabric. As long as the weather isn’t windy, this method works well, keeping street lights and other light sources from interfering.
For an even easier and easy-to-transport solution, place a towel or dark cloth over your head when you’re looking through a telescope or binoculars.
Best stargazing conditions
There are conditions that are more friendly for star-gazing. Plan for stargazing on nights with a clear sky, meaning no cloud cover, along with low humidity and reduced dust. You can see stars better in the winter months, so bundle up and get ready to look up!
Also, keep an eye on the moon cycle and plan your stargazing adventures for when the sky will be darkest.
Before you go outside your house to stargaze, turn off all the lights in your house. The less “light pollution” you have, the better you can see stars. If you have friendly neighbors, you might want to ask them to do the same while you’re searching for stars. You could even turn it into a fun event in your neighborhood.
If you’re trying to avoid light pollution, aim for late-night to early-morning stargazing. This is when the pollution is the most diminished. So, keep your schedule flexible if you can to take advantage of the best time and dates for sky-viewing.
What to look for up there
Now that you’ve found the best spot and have the equipment you need, it’s time to start looking. Starting with the easily-identified moon is ideal. Viewing the moon and its craters is best at the quarter moon to crescent phases. Let your eyes adjust to the dark, and then start looking for stars.
See if your kids can pick out points of light and look for patterns and constellations. Try to find the well-known Big Dipper/Ursa Major, or Orion the Hunter, or Taurus the Bull. Use the phone app or a star map to locate constellations, planets, the moon, and other cool stuff. Have fun learning how to use your telescope if you purchased one. Encourage your kids to talk about what they see and look for opportunities to learn.
Consider building a DIY observatory
If you find that your family is really into stargazing, and you have good enough conditions on your own property – and a bit of extra space – you may want to build a backyard mini-observatory. It doesn’t have to be grand, and it is a fun family project that lets you keep your telescope set up and calibrated and stop straight-line light from polluting your view of the sky.
Perhaps most importantly, it provides a place out of the elements, especially appreciated in winter. So, you’re not standing out in the snow, but instead, you’re in your homemade observatory, in relative comfort with snacks, drinks, star maps, a notebook, and other things within arm’s reach. Check with your local building code and permitting department before you start building.
Soar higher into astronomy
Look on the internet for cool websites your kids will want to visit and revisit. Keep track of websites that are age-appropriate to your child. Some even include lesson plans to help them build their astronomy knowledge. If you want to set up lesson plans of your own, look at NASA’s education website. NASA also has an Astronomy Picture of the Day. Not only does that site feature an amazing photo every day, but it includes information about the picture’s subject.
Whether your child is in school or homeschooled, there are lots of online astronomy teaching resources for parents, kids, and teachers. A couple of cool learning sites are https://geology.com/teacher/astronomy-space.shtml and http://osr.org/en-us/articles/great-space-and-astronomy-lesson-plan-ideas/.
Look for a local astronomy and stargazing club to join. This is a great opportunity for beginners to learn from more seasoned stargazers at regularly held viewing sessions.
Whether you go all-out with building an observatory or just do occasional star-gazing during meteor showers, you’ll have a newfound appreciation for the world beyond your own, and have a new activity to enjoy with your children.


