Printmaking is a popular art form that’s a favorite activity for craftspeople and artists. This fun hobby is a great way to transfer a variety of prints onto various materials like fabric, paper, glass, and more. If you’re interested in picking up printmaking as a hobby, having your own printmaking studio at home makes the process easier. Since printmaking can be a rather messy activity, it’s a good idea to have a separately designated space or your own room so you can work undisturbed. Even if you only have room for a small printmaking studio, it’s easy to do as long as you have the right type of organization. Read on to discover how to set up your very own printmaking studio at home.
Organizing Your Printmaking Space into Zones
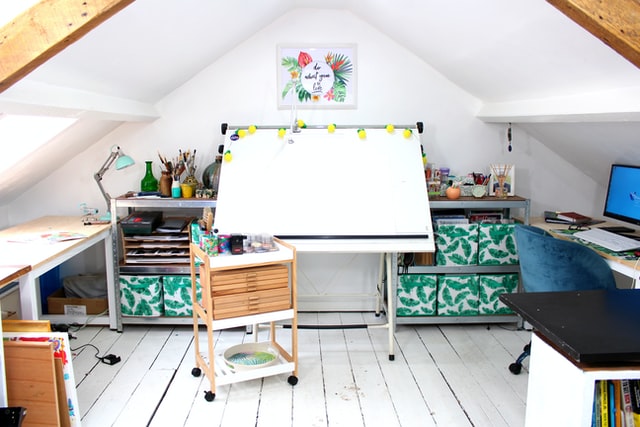
Before you start working on printmaking, it’s vital to get your space organized. Here are some tips to help you arrange all of your printing tools and supplies, making it easy and enjoyable to work in your new studio.
Storage Tips
- Install some cabinets, shelves, or cupboards, so you have a place to store your printmaking supplies and equipment. Hang a pegboard on one wall and use hooks to hold onto various tools, making it easy to find everything you need easily within reach.
- Make sure that your inks are stored in a cool, dry place away from direct sunlight. The ink should be kept at room temperature whenever possible. Place the inks inside a cabinet and store them in an opaque, airtight container or tube.
- Use your hooks to hang printmaking tools like rollers so they don’t damage your prints or other surfaces in the room.
- Store all tools in a box, and ensure that all blades are either retracted or covered to avoid injury.
- Use bins with labels to help you easily identify smaller tools and supplies. You can place the bins on a shelf or inside a cabinet for easy storage and organization.
- Separate mediums by type. For example, store paper, glass, and fabric for printmaking separately and keep them organized based on the type of material or color, so it’s easy to find what you need. A dresser or toolbox is a great way to store these items neatly away.
- If you need help setting up your printmaking workspace, look for a handyman near you who can help you with things like installing new cabinets and lighting or putting up a pegboard.
- Create different stations for each step of the printmaking process to help you stay on track and ensure that everything remains in its proper place. This makes storing and organizing your supplies easier once you’re done using them.
- Organize and store everything against the wall and store items vertically, so you have ample floor space to work and move around as needed.
Preparation for Your Printmaking Workspace
- Make sure that your studio is as comfortable and as safe as possible. If you prefer to sit down while working on your prints, choose a comfortable, ergonomic chair to help prevent neck and back pain. A chair with wheels is ideal so you can easily move around the studio without getting up and down.
- Use sturdy tables or a durable workbench that can handle plenty of movement, such as rolling and cutting without jiggling or becoming wobbly.
- Always consider height when you’re printmaking. Choose furniture that is at the proper height whether you prefer to work sitting or standing. The right height will help you avoid straining your neck, arms, and back as you work.
- Use a cutting mat on top of your table or workbench to prevent cutting or scratching the surface.
- Try to choose a room near a bathroom or utility area so you have access to a sink to wash off brushes, rollers, and other printmaking supplies before you put them away.
- Install good lighting that makes it easy to see while you work. Task lighting such as a table or floor lamp with a directional head allows you to adjust and move the light as needed. If your printmaking studio has a window, add some curtains or blinds to help prevent glare.
- Determine which temperature the room should be for printmaking so that your ink dries correctly. Add a fan if you need to keep the air circulating and help you stay cool while you work.
- Ensure that your printmaking studio has proper ventilation so that you’re not breathing in potentially harmful fumes and toxins. Choose natural inks that are safe and free of dangerous chemicals whenever possible.
- Always store your inks, blades, and other tools safely out of the reach of pets and children. If your studio has a locking door, lock it whenever you’re not in the room.
Printing in Your New Studio
- Before you start printmaking, remove everything you don’t need, and make sure that your work surface is level and clean.
- You can organize your studio to make doing your printing techniques easier. For example, create various areas within the room to suit your workflow. You can put stacks of clean paper to your left and inks and equipment to your right to avoid making a mess, preventing unwanted ink from getting onto your paper, glass, or fabric.
- Protect your floors from permanent ink stains by installing water-resistant and durable flooring that is easy to keep clean. Vinyl, ceramic tile, and linoleum are all excellent choices and are easy to wipe clean if any ink gets onto the surface. A protective floor mat or area rug is another easy and affordable alternative if you need to protect your floors.
- If your studio isn’t close to a bathroom or laundry room, install a sink if possible. A sink allows you to wash off rollers and brushes easily before you need to put them away. It also helps you wash your hands quickly between color changes or prints. If you can’t install a sink in the room, a large tub or bowl of water will do.
- Stock up on wet wipes or paper towels so you can wipe your tools and hands clean while you’re working.
- A yoga mat is an easy and affordable way to cover your work table or bench to protect it while printmaking. The soft material helps you easily roll or brush over your designs as you work without causing any damage to the surface underneath.
- Wear protective gloves, goggles, or a face mask while working to protect your hands and eyes. Remember to ensure proper ventilation as you perform your printmaking techniques.
Drying Your Prints
Drying is a crucial part of the printmaking process, so make sure your studio is warm and dry. You should also make sure that you have enough room to separate each print. It’s essential to keep humidity levels low in the room. Ideally, the humidity level should be 50% or less to ensure that your prints dry correctly.
- Dry your prints by hanging them up with some clothespins or by laying them flat on a surface. Drying racks are also a great way to allow prints on fabric or paper to dry thoroughly. You can also use your pegboard and hooks to dry your prints.
- Never point a fan directly at your prints while they dry, or it could cause the ink to run and permanently damage your hard work.
- While your prints are drying, keep them away from your work area to prevent ink from splashing onto the prints you’ve already completed.
- Feel free to hang the prints outside from a clothesline to speed up the drying process if you’re printing on fabric. Just make sure that the weather is clear and dry and that the material is not hanging in direct sunlight. Don’t hang prints outside on windy days, or else they could come loose and fall onto the ground below.
- You can make your own drying racks by looking for several tips and tutorials online. Make sure that you have ample room before you design your drying rack so that the studio doesn’t become overcrowded. You can also make your drying cabinet for screen printing projects.
- Learn which drying methods work best for specific mediums. For example, fabric and paper can be hung to dry, while glass prints should be laid flat to prevent the ink from running or dripping.
Pro Printmaking Tips
Here are some pro tips to help you ensure that your new printmaking workspace gives you the results you want.
Invest in the Right Equipment
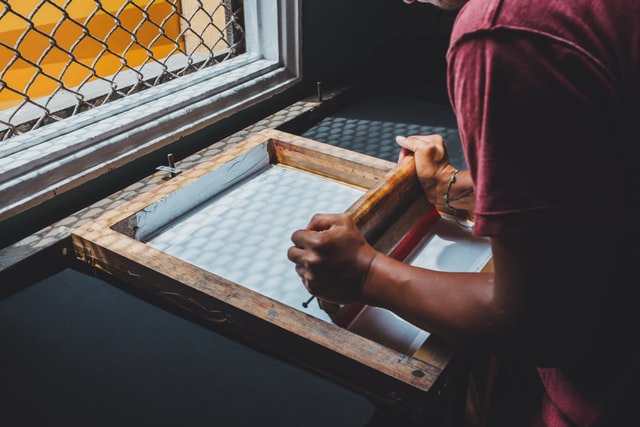
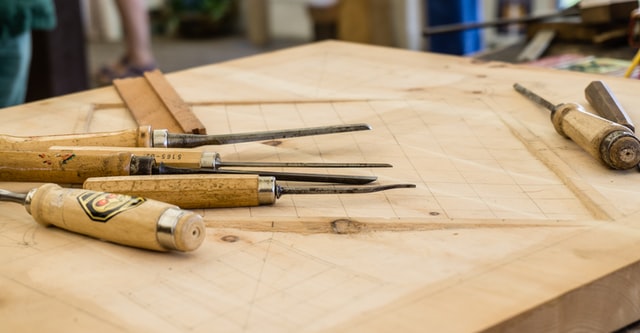
Each printmaking technique or method requires the use of different equipment. For example, woodcut prints need sharp carving tools, while printing on paper or fabric requires screens, paintbrushes, and rollers. It might cost you more to purchase the best possible option, but the investment will be worth it and will ensure that you get optimal results. It’s worth it to spend more on high-quality screens and inks if you want your prints to be clear and detailed, for example.
Source the Most Suitable Solvents and Inks
Some solvents and inks may contain toxic ingredients, so it’s vital to try and purchase the most natural and least toxic inks available. Pay close attention to the flammability and stability of the solvents you use. Certain inks and solvents work better for specific techniques than others, so you may need to do some trial and error until you find the products that work best for you. Whenever possible, look for natural, eco-friendly inks to keep you safe.
Follow Safety Measures
- Always ensure that you have powerful ventilation that keeps the air clean and circulating.
- Store chemicals in their respective hazard-proof containers and cabinets and separate them based on the category.
- Dispose of rags used to clean up spills and ensure that solvent containers are adequately sealed and closed when not in use.
- Use cutters and carving tools that require a pulling motion rather than pushing to help minimize the chance of injury.
- Always follow the operating instructions for your equipment carefully.
If you’re new to printmaking, it’s easy to create your own studio space at home, even if it’s small. With the right organization and proper printmaking techniques, you can enjoy this fun hobby right in the comfort of your own home. Keep these tips in mind, and remember that you don’t need a massive room or a sophisticated setup to get started and enjoy printmaking at home.


