
Food preservation is more versatile than people realize. By learning what you can preserve, and how to do it — freezing, dehydration, infusion, vacuum sealing, dry curing and smoking, and water bath canning — you can enjoy healthy fruits and vegetables all year long. You’ll save money by buying in bulk, and since you’ll preserve what you don’t use, you’ll limit the amount of food waste your home produces.
Food preservation has always been a tool that humans have used to survive. Ancient humans used the sun to dehydrate fruits and salt to dry–cure fish, or they’d use ice to freeze meat for later consumption.
People learned the art of pickling foods in beers or wines to preserve them. Like ketchup, Worcestershire, and relish, many sauces are all the results of pickled brine.
Water bath canning was discovered in the 1790s, where heating a jar would kill any microorganisms inside, then the subsequent cooling would create a vacuum seal which provided safety for the food.
Freeze drying was discovered as a medical technique for transporting blood during World War II.
The best modern food preservation techniques are:
- Freezing
Freeze Drying
- Canning
- Dehydration
- Infusion
- Dry curing and smoking
- Vacuum sealing
Most of these techniques don’t require special gear (though it helps) to achieve, and you’ll be able to eat healthier for less money. Let’s explore them.
Freezing
Freezing food is an excellent food preservation method if you have a reliable freezer; helps retain most foods’ natural flavor and texture, and it’s easy to do correctly. It also doesn’t require preservatives or brines to pull off, and most kitchens in industrialized countries come with freezers attached.
Most fruits will wonderfully freeze as they are, but vegetables freeze better if they are blanched or cooked first. You blanch vegetables by placing them in boiling water for a few minutes (usually two or three, depending on the vegetable), then immediately transfer them to cold water to stop the cooking process. You cool the vegetables in ice water for the same amount of time, then pat them dry using a towel. Then you freeze them.
You can store fruits and vegetables at their best for roughly six months in the freezer. To freeze your produce, seal it in an airtight, freezer-safe container or plastic bag with little to no air inside, then place them in the freezer. Food exposed to frozen air can develop freezer burn, which hurts the food’s flavor and texture. Freezer-burnt food isn’t dangerous to eat, but it isn’t ideal — it doesn’t taste great.
If you are freezing cooked food, let it cool before you freeze it. If you need to refreeze a meal you thawed, cook it again before you refreeze it. If your freezer looks a bit full, that’s a good thing — a full freezer consumes less power than an empty one. Be sure to date and label your food, so you know what you have and how long it’ll stay at its best.
Freeze Drying
Freeze drying is a way to dehydrate your food, by turning the water of the food from a solid to a gaseous state.
It is freezed with a high-pressure vacuum to remove the water in the form of steam. The steam is collected on a condenser, where it’s turned again into ice to be removed. This process extracts all the moisture and humidity
It is a great method of preserving your food because the physical structure of it remains intact, keeping also its nutritional value. Makes it also significantly easier to rehydrate.
Foods that can be freeze dried include:
- Coffee
- Fruits and Vegetables
- Meat
- Rice
- Fish
- Syrup
If you can’t afford a freeze drying machine, you could do it on your house freezer just make sure to consider this suggestions:
- Pick the freshest products possible.
- Make sure to wash them properly and cut them into small pieces (smaller than you would do in a machine)
- Place the chunks on a tray, making sure not to overlap them.
- Keep the freezer at the lowest temperature
- Leave it at the bottom of it at least 2-3 weeks
- Once it’s ready, pack it in an airtight bag.
Water Bath Canning
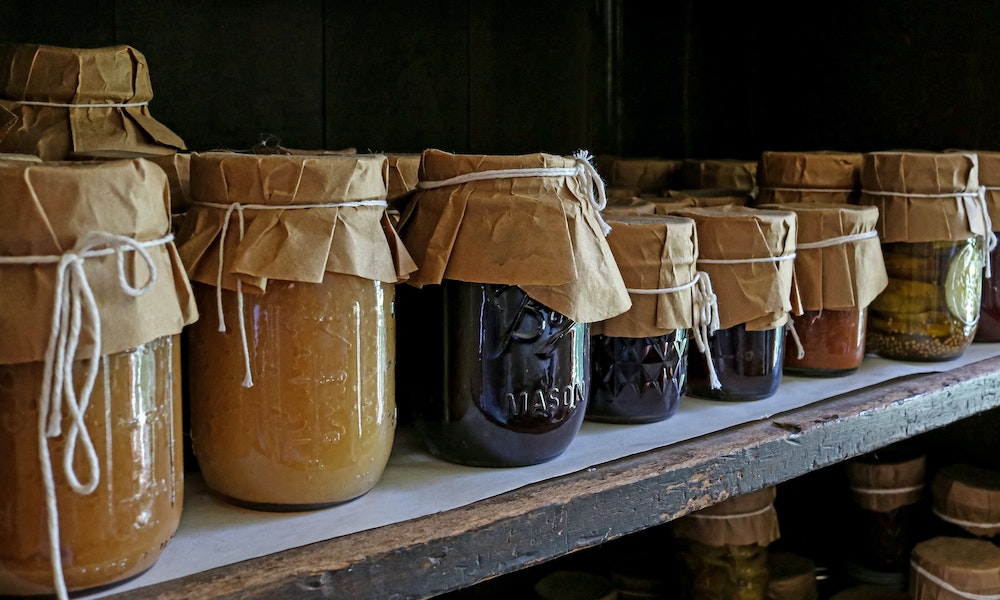
Water bath canning is an excellent way to preserve acidic foods, such as spaghetti sauce and salsa, marmalades, jams, and even pickles. This method of food preservation kills off bacteria, such as botulism, E-coli, and salmonella, and vacuum seals the jars so new bacteria and oxygen can’t access the food within. Water bath canning, also known as hot canning, is a safe and easy way to store foods with a high acid content, and you can do it at home with just a few materials.
It’s important to note that you cannot do water bath canning on specific foods, like low-acidity soup broths or animal products. You can water-bath can vegetables with low acidity levels if you pickle them first with the proper vinegar ratio. Alkaline foods – low acid foods – must be pressure canned instead. Pressure canning requires a specific heavy-duty kitchen tool — a pressure canner.
For water bath canning, you’ll need tongs, a ladle, a funnel, mason jars, and a large pot. Start with the jars empty, and submerge them in a filled pot. The heat should be medium to warm the jars so they don’t change temperature too quickly and explode from thermal shock. Pull out the jars, and fill them before they have a chance to cool. Leave a half-inch space at the top of the jars so they’ll have room to seal correctly.
Sterilize the rim of the jars, then put the lids on and seal them tightly. Place the jars back in the pot, so they don’t touch each other and are an inch under the water. Bring the water to a boil for as long as your specific recipe calls for, then turn off the heat and let the jars and the pot rest for five minutes so the pressure can stabilize.
Remove the jars, and place them on a dish towel. If you put them directly on a countertop, the temperature may shock and break the jars. Then let the jars rest for 12 to 24 hours. If the jars pass the lid test, you’ll know they’re ready – press on the top. If the lid pops up or down, the seal isn’t airtight. The food is still good for a few days in the fridge, so it’s not a waste.
If the jar top doesn’t pop, you can store your canned food in a cool and dry pantry. Once you get into canning, you can fill your shelves with delicious sauces and pickled veggies. There’s no better time to upgrade your pantry storage, and ensure you have the shelving to handle your food storage needs.
Dehydration
Dehydrating food is one of the easiest and cheapest ways to preserve food for a long time, and it’s pretty versatile. You can dehydrate most fruits and vegetables, herbs, and even some meats for later, but not all of them. Foods with a high-fat content will go rancid shortly after being dehydrated, including avocados, olives, milk, butter, and fatty meats. If you’re unsure about a particular food, search and find out if it’s okay.
There are three methods to dehydrate your food:
Dehydrator – There are a lot of dehydrators on the market, and they’re pretty easy to use. Load up your favorite foods, and turn the machine on. Your foods will transform into yummy, dehydrated snacks. Some foods, like blueberries, work best if you boil them for 15 seconds, so the skin cracks. Some fruits, such as apples, retain their color better if you spray them with lemon juice first. You should blanch low-acidic vegetables before you dehydrate them.
Low-heat in the oven – Start by cutting your fruit or vegetables very thin, and place them in the oven at the lowest possible heat. Let them cook for 6 to 8 hours, and flip them in the middle. Doing this isn’t a perfect dehydration method, as the oven cooks food – whereas a dehydrator removes moisture – but it will give you a similar result.
Solar power dehydration – This is an excellent choice for those hot summer days, and the best part is you can DIY and save on electricity costs. You can make your own using a heat-absorbent tray and a stretchable cloth to keep the insects away. If you’re going with this method, consider a great place outside your home to set up and relax in warm weather, such as your terrace, patio, or rooftop.
Infusion
Infusion isn’t a typical food preservation technique since you’re technically not preserving the food itself, but rather the flavor and nutrients the food contains. Infusion itself is relatively simple — you submerge herbs in a solvent, and that solvent will take on the taste and nutrients of the herbs. You can do this with roots and fruits to create sauces and syrups that elevate your kitchen. Elders infused ancient medicines with herbal mixes.
First, wash and sterilize your containers before you use them by boiling them for 10 minutes. Then, you’ll need to choose your solvent. Water, oil, vinegar, honey, or even alcohol glycerine are great options. You take your fruit or herb, place it in your solvent, and leave it sealed for a few days. Keep an eye on the infusion – if bubbles start to form, that’s a sign of fermentation, which is not the goal.
You can speed things up with sous vide, which cooks the food at a low temperature while submerged under water. When considering what to infuse, it’s important to note that you should only use dried herbs in honey or oil. Before you try this out, look up what herbal oils are safe for consumption. Fresh and dried herbs are great for infusing alcohol and vinegar. You should never infuse eggs, meats, fish, or dairy products.
Once you realize how easy it is to create infusions and how versatile and delicious they are as sauces, mixes, and flavor highlights, you will want to make a lot more. While waiting for your infusion to complete, you’ll want to store your jars somewhere dark, cool, and dry. Your pantry is an excellent choice for this, and if you’re low on room, you can custom-make some shelves to store what you need. Consider a local handyperson to help you out with your project.
Dry Curing & Smoking
Dry curing is a great preservative method precisely for meat and seafood — though some citrus fruits and dried herbs can be dry cured as well. This method was used long before refrigeration and works with salt and sugar, which are naturally antibacterial. This method removes moisture from the meat and prevents the growth of plasmolysis within the meat, which has the added benefit of intensifying the flavors to delicious results.
You’ll need a space where a curing chamber won’t be disturbed. Back in the day, cellars and basements were great places to cure meat, but as home insulation improved, that no longer became the case. Your meat needs to cure in a dark place with an average of 70% humidity and an average temperature of around 50 – 60F. Your basement or garage may be the best place to install a dry curing chamber, so it isn’t bothered. You can make your dry curing chamber using an old fridge or freezer with a humidifier installed inside it — just be sure the humidifier doesn’t also produce heat, as that will alter the curing results.
You can take your curing up a notch by smoking the meat. If you cold-smoke the meat (using low temperatures between 60 to 120F), you’ll still be curing the meat. Doing this allows you to preserve the meat for a long time afterward. If you hot-smoke the meat (using temperatures between 200 to 300F), the meat is cooking over time. This method is best for flavor but is not an effective preservation technique.
Vacuum Sealing
Vacuum sealing your food keeps air away from it while in the freezer, ensuring the food lasts long, staying fresh, and preventing freezer burn. Most foods can be vacuum sealed, but not all of them. You need to blanch many vegetables before sealing them.
Mushrooms and bananas ripen faster when vacuum sealed – but if you peel and freeze the bananas first or cook the mushrooms, you can vacuum seal either food afterward. Raw garlic and onions produce a natural gas that ruins the vacuum seal, and the steam from freshly cooked vegetables creates a similar effect. Soft cheeses also shouldn’t be vacuum sealed, as they’ll grow mold – though hard cheeses don’t share this issue.
The best way to vacuum seal your food is with a vacuum sealer. You can still accomplish the same effect if you don’t have one. Place your food in a plastic bag, and close it most of the way. Insert a straw, and suck the remaining air out of the bag before sealing it completely. You can also try submerging the plastic bag almost entirely underwater, leaving just the tip of the bag out of the water. The water pressure will take the air out of the bag, and you can close it up.
Food preservation is a great way to utilize bulk discounts and create delicious meals and snacks for your home. Some methods take a bit of DIY to get going, such as building your dry curing chamber or solar dehydrator. In contrast, others, like wet bath canning, freezing, vacuum sealing, and infusion, are techniques you can begin immediately. It’s crucial to research what foods can be preserved in each method to prevent bacteria from ruining food or making you sick. Once you have the hang of that, your pantry shelves will be packed to the rafters with delicious, healthy foods all year round.


