
Are you one of those people who stare aimlessly at the hardware parts aisle and end up buying multiple packages of various sized nails and screws, only to find you’ve picked the wrong ones? My own home is filled with hardware that was too big or too small for the project. I’ve even been known to purchase one of several sizes of hardware, testing each one out, then going back to the store to purchase more of the one that actually worked. It’s time, once and for all, to understand what the various numbers written on the box actually means.
Everyone knows you need the right tools for the right job, but finding the correct size fastener for the job is harder than it looks unless you know what the package is describing. There are many sizes for nails, and variations of end and tip designs depending upon the job at hand, as well as varying lengths and durability. If you’ve ever wondered how to buy the correct fastener for the job, here are some tips for you.
Nail Sizes
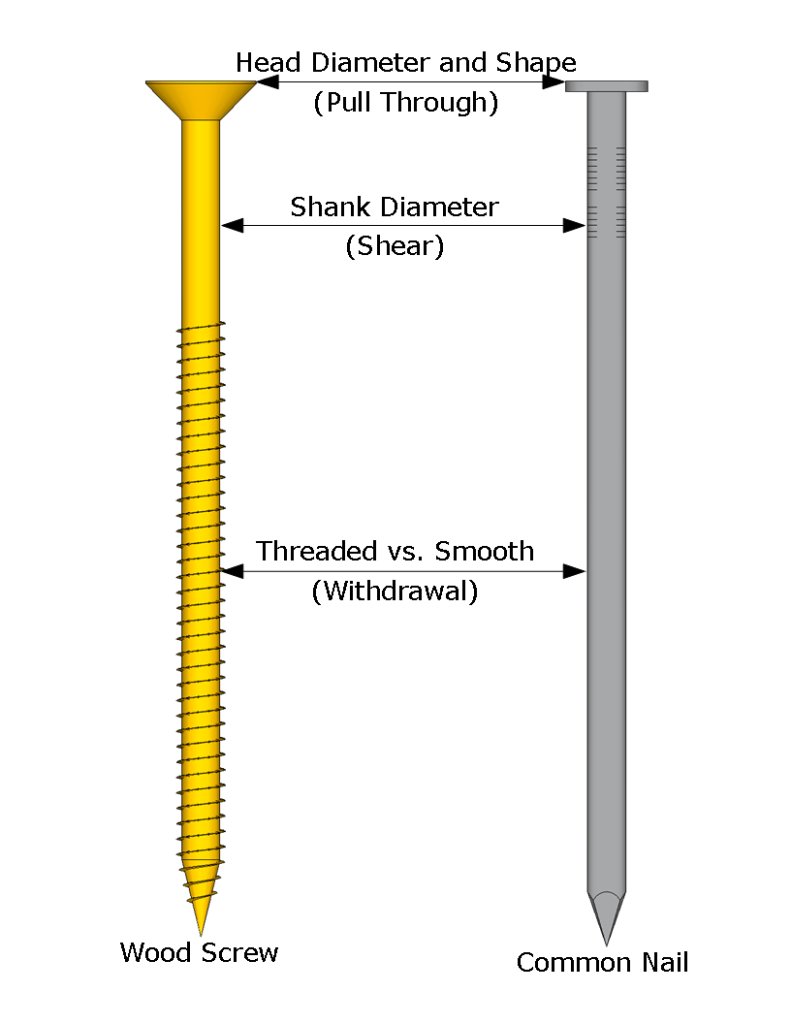
In the United States, the length of a nail is designated by it’s “penny size” and is marked with a number (the higher the number, the longer the nail) along with the letter “d.” The “d” is an abbreviation for denarius, a Roman coin similar to a penny; this was the abbreviation for a penny in the UK before decimalization. The “shank” is the part of the nail that is driven into the wood (or other material) the “head” is the part of the nail that is not driven into the material. The chart below, found on ThomasNet, shows standard nail sizes along with their penny size, shaft diameter and length, and head diameter.
|
Nail Size |
|
Shank Diameter |
Shank Length |
Head Diameter |
|
Penny Size |
Guage |
Nominal |
Nominal |
Apprx. |
|
2D |
15 |
0.072 |
1″ |
3/16″ |
|
14 |
0.083 |
1″ |
13/64″ |
|
|
3D |
14 |
0.083 |
1.25″ |
13/64″ |
|
4D |
12 |
0.109 |
1.5″ |
1/4″ |
|
5D |
12 |
0.109 |
1.75″ |
1/4″ |
|
6D |
11 |
0.12 |
2″ |
17/64″ |
|
8D |
10 |
0.134 |
2.5″ |
9/32″ |
|
10D |
9 |
0.148 |
3″ |
5/16″ |
|
12D |
9 |
0.148 |
3.25″ |
5/16″ |
|
16D |
8 |
0.165 |
3.5″ |
11/32″ |
|
20D |
6 |
0.203 |
4″ |
13/32″ |
|
30D |
5 |
0.22 |
4.5″ |
7/16″ |
|
40D |
4 |
0.238 |
5″ |
15/32″ |
|
60D |
4 |
0.238 |
6″ |
17/32″ |
|
2 |
0.284 |
6″ |
17/32″ |
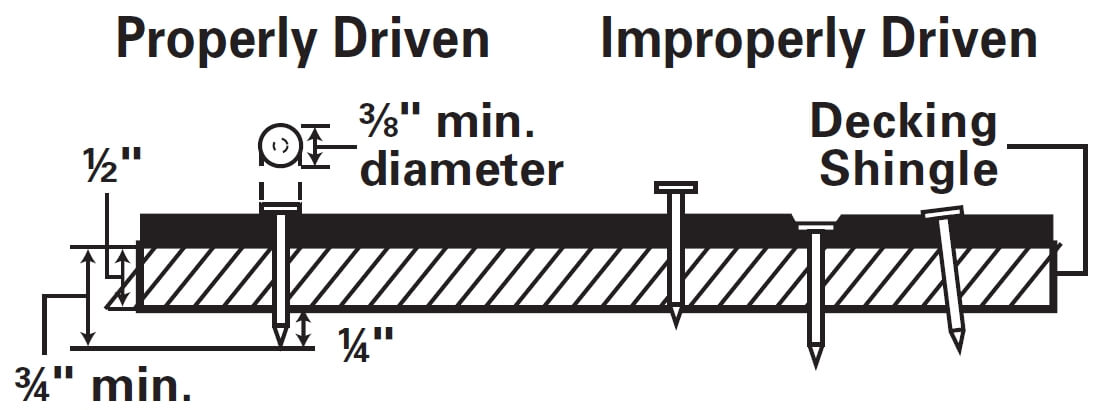
Measure the thickness of whatever it is you’re trying to drive the nail in to, taking into account how much of the nail you want to drive into the material. Whenever possible, bring in a sample of the material(s) so you can accurately measure the nail length. If you still do not know which length or diameter to purchase, a hardware store associate can also help you determine the correct size. The basic rule of thumb is the nail should be about 3x as long as the thickness of the material you are driving it through. You’ll want to have about 2/3 of the nail providing the “hold.” Of course, there are exceptions to this rule and you may want to consult a hardware store specialist and get their opinion. You can also look for specialty nails that are designed for standard jobs such as drywall nails or roofing nails. Here is an illustration of how to choose the best length for attaching roofing shingles.
Types of Nails
There is a different nail type for various materials. Once you’ve decided the length you need, you’ll want to understand what materials you are trying to attach together. Whenever possible, bring a sample of the material with you to the hardware store. If you are attaching two different types of materials together, consult your hardware store associate and get their recommendation. Here is an illustrated list of common nail types.


