Chocolate. To many die-hard chocolate lovers, it’s a sentence all in itself. If you fall into this category and you’re looking for a gratifying home business, chocolate-making might be the sweetest side hustle.
If you think chocolate is ubiquitous worldwide, you’re right. Cultures across the globe are enamored with chocolate, using it in varying and unique ways. Chocolate can be used in countless ways, from making brownies to preparing hot chocolate for warming up in the winter or creating all kinds of sweet treats for kids and adults. In many cultures, they even pair chocolate sweetness with various spices – including hot peppers – and use it to balance spiciness in savory dishes.
Put your own spin on chocolate and craft unique, distinctive creations, or keep it classic and offer the type of dreamy, drool-worthy delicious desserts we all know and love. Either way, a home-based chocolate business allows you to work on your own schedule with much lower overhead – not to mention that your house will always smell incredible. If you want to start a business at home, there are a few things you should know in advance about the setup and what you need to start making chocolate.

So, what exactly is chocolate?
Chocolate has come a long way from its start as an unassuming bean. Before you start learning how to make chocolate, read about the history of cacao and how it became the global sensation it is today.
A little history
From the Olmecs to the Mayans to the Aztecs to Europe and North America, the phenomenon of chocolate has spread to nearly all corners of the globe.
In its most ancient form, cacao beans were consumed by mixing them with chili peppers, honey, or water. As this sensory treat made its way to the Spanish court and across Europe, it was powdered in a method called “Dutch-processed cocoa.” This method made mixing with water easier and led to the continuing popularity of hot chocolate as we know it today.
Until 1847, chocolate was consumed in liquid format, but you can thank J.S. Fry and Sons for creating the good old chocolate bar. Shortly after that innovation, Henri Nestle got involved and brought us the brand we know today. While commercial chocolate production has certainly changed since then, including providing a living for 40 to 50 million people worldwide, it has its roots all the way back from Olmec to Nestle.
Types of chocolate
If you’re already an amateur chocolatier searching out ways to convert your passion for chocolate into a business opportunity, you might not be surprised that there’s a fourth type of chocolate.
- Dark – Dark chocolate is the closest to how the ancient Olmec and Maya chocolate might have tasted. Made without milk powder or sweeteners, dark chocolate is a classic choice.
- Milk – This much-loved type of chocolate is sweetened, and the flavor is moderated by adding milk powder.
- White – Despite common misconceptions that white chocolate isn’t “real” chocolate, authentic white chocolate is indeed made from part of the cacao plant. White chocolate uses cacao butter instead of cacao bean solids to achieve its signature silky texture.
- Ruby – The newest star on the chocolate scene, ruby chocolate is the fourth type of chocolate. Created by chocolate innovator Barry Callebaut, ruby chocolate has a rich, red velvet color that’s all-natural. The color comes from the ruby cacao plant and is harvested and processed to preserve its hue and distinct silky berry flavor.
Benefits of chocolate
The benefits of chocolate are studied and significant – but there’s a catch. The benefits below apply to dark chocolate only. Milk chocolate and white chocolate require sweeteners and additives to make them taste the way they do, which cancels out their potential health benefits.
- Heart health – The antioxidants in dark chocolate can reduce the chances of coronary disease, stroke, and high blood pressure. As much as we’d love to say that dark chocolate can solve all your health woes, it won’t be the silver bullet. However, incorporating it into a healthy diet and lifestyle can help your overall heart health.
- Gut health – Properly processed chocolate contains abundant minerals and micronutrients, which can benefit your overall gut health. Eating dark chocolate likely won’t be the one thing that saves your gut health, but it can be an enjoyable part of a healthy lifestyle.
- Energizing – Cocoa and cacao both contain caffeine naturally, meaning you can get an energy bump from enjoying a decadent square of dark chocolate. Much like a cup of coffee pre-workout can give you that extra oomph to power through, dark chocolate is a great way to get through the mid-afternoon slump while staying healthy.
- Endorphins – Studies show there are numerous elements of dark chocolate that have a positive impact on your brain chemistry. Flavanols, a compound found in cacao, can boost brain function, memory, spatial awareness, and blood flow to the brain.
Sustainability and ethical chocolate production

Much like coffee, chocolate can be detrimental to the countries of origin. The African Ivory Coast is the biggest producer of cacao beans in the world, producing up to two million tons of cacao beans each year. Lax labor laws can mean that local workers are taken advantage of. Boost your social responsibility by following these sustainable/ ethical tips for sourcing products for your chocolate business:
- Bean-to-bar process – It’s easy to take the ostrich approach to source ingredients, but burying your head in the sand won’t help the people on the other end of the supply chain. Cacao bean farmers benefit greatly from having socially responsible businesses involved in the sourcing process. There’s no question that your prices rise when you source ethically versus wholesale. The direct impact of these costs not only helps you to justify your business practices but can also help you promote your chocolate business.
- Fairtrade Certification – If you’re not quite ready to get directly involved with producers, consider using Fairtrade Certified ingredients. Fairtrade is an internationally recognized certification that uses a rigorous audit process to ensure products are ethically sourced.
- Eco-friendly certified procedures – It takes some dedication, but if you’re willing to commit to a zero-waste, landfill-diversion policy for your business, you might be on track for an eco-friendly certification. The good news is that despite stringent process requirements, it’s much easier to implement from the inception of your business.
How do I make chocolate?
The process of making chocolate from cacao beans takes time and patience. Here’s the breakdown of how to make chocolate right in your home:
Cacao Beans Processing

Fermentation
To get started, open the cacao pods, take the beans out, and discard the pods. Remove any sprouted or blacked/darkened beans.
Once the beans are separated, put them into a fermentation bin and let them ferment for five to seven days keeping the temperature around 120ºF (49ºC). You can control the temperature by filling bottles with warm water and putting them inside the bin along with the cacao beans. (You can boost the fermentation process by adding to the beans some yeast previously dissolved in ¾ cup of water).
This is called dry fermentation. During the fermentation phase, the yeasts will start transforming the cacao seeds and making them develop flavors and aromas. The yeasts will eat the pulp fruit and leave a liquid behind, so make sure you drain your container once a day and turn the beans twice a day after the third day.
After five days, your beans will have fermented and now will have turned into a nice pink-brownish (and even purple) hue.
Drying
Now that fermentation is complete, it’s time to dry your cacao. This step is crucial, and should be done slowly without rushing. This is because if the cacao beans are dried too quickly, the shell (also called husk) will harden and trap a lot of off-flavors, sourness, and bitterness inside the beans.
Take the beans out of the fermenting container and spread them evenly on palm leaf mats or metal trays in an open or very well-ventilated, clean, and dry area. It will be better if you have a place with direct sunlight. Put a fine wire mesh on top of the cacao beans to avoid any bugs lying on the beans, and let them dry for 5 to 8 days. If you’re drying the cacao beans indoors, the drying stage will most likely take longer. Nevertheless, you can boost the process with good room temperature control and proper air circulation (aka electric fans).
Rotate the beans every 8 hours to ensure even drying.
Roasting
Cacao beans are now dry, and this can only mean one thing: roasting time!
As you may have noticed, so far, every step in the chocolate-making process contributes to the development of flavors and aromas. Roasting is important for this, but it also helps kill any remaining harmful bacteria or fungi, makes separating the shell from the bean easier, and reduces the water content inside the beans. This is important because water and chocolate don’t get along well.
During the roasting process, the cacao beans will be subjected to a very high temperature, which will gradually lower until the beans start making a popping or cracking sound, right before they start to get burnt.
Chocolate making is like grandma’s cookie recipe: every recipe is different. But also, most grandma’s cookie recipes have some common ground. Here we will give you some general guidelines for roasting your cacao, but don’t hesitate to experiment with times and temperatures. At the end of the day, it’s all about finding your own taste and printing your own character into your chocolate.
Roast the beans in the kitchen oven starting at a high temperature of 300ºF – 350ºF (150ºC – 170ºC) for 5 minutes and lower it down 5-10 degrees every 5 minutes. The whole process should take about 30 minutes.
If you want to go further and get a more even and controlled roasting, try getting a tabletop drum roaster. This will reduce the chances of under- and over-roasting (aka burning) the cacao beans.
Once roasted, remove the husk from the beans and grind them in a food processor until you get a paste consistency. This step is called pre-refining, which can be very time and energy-saving for the next stage of the process.
Chocolate Liquor Processing
Refining & Conching
Have you ever tried chocolate that’s really smooth and gentle on your tongue? The refining process breaks down the chocolate into tiny particles from 70 to 10 microns. A micron is a millionth of a meter; the human tongue can detect particles down to 10 microns, so the smaller the particle, the smoother the texture will be.
At this point, you can add sugar or a powder sweetener to your chocolate liquor. A natural calorie-free sweetener like monk fruit or stevia works if you want to offer a sugar-free option.
If you’re making milk chocolate, you can also add milk powder at this point. You can’t use cream or milk because the water in it will react with the oil in the cacao, causing your chocolate to have a chunky, unpleasant texture.
Adding cacao butter gives your chocolate an even smoother, dreamier texture. It also somewhat dilutes the flavor, so keep that in mind when deciding what you want your final product to be. Cacao butter is one of the ingredients that gives chocolate truffles their indulgent, melt-in-your-mouth texture.
Conching is the step of the chocolate-making process where both flavors and aromas are developed. It consists in incorporating air into the refined chocolate liquor to volatilize tannins and other unpleasant compounds like acetic acid (aka vinegar), making the chocolate milder as the process goes on. In many cases, refining and conching happen simultaneously on the same machine.
The term conch derives from the Spanish word ‘concha,’ which means shell. This is because the vessel where the chocolate was originally contained had a conch shell shape.
But how is it done exactly? Well, it’s basically a process where a couple of granite roller stones work against a granite stone bed, refining and airing the chocolate liquor for quite a few hours. Depending on the chocolate maker, it can take from 24 to 96 hours. Keeping the temperature at 104º F (40ºC) during this stage is key. Thankfully, today you don’t need to buy a big room-sized melanger machine or go to a specialized purveyor. A small-scale (aka home-) melanger, a wet grinder, or a nut butter grinder will do the job. They’re basically the same thing and will help you refine and conch your chocolate just like the pros, and you can find them online starting at a couple of hundred dollars.
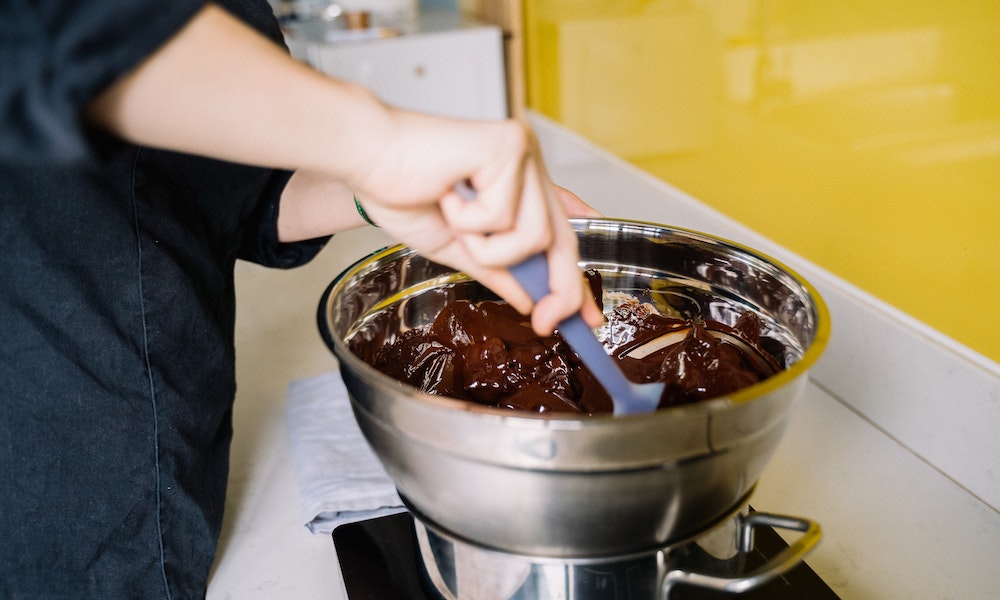
Tempering
The cocoa butter present in chocolate is a 6-phase polymorphic crystal. This means that depending on a specific temperature, it can change into any of its six different types of stages.
Have you ever noticed that after leaving a bar of chocolate in the fridge for some time, chocolate starts developing a lighter color “bloom,” plus the texture’s not velvety and pleasant anymore but sandy instead? Well, that’s because chocolate began to change to a different crystal stage.
Only one of this kind of crystals (Beta-5) has the characteristics we want, like a nice glossy shine, a crisp snap when broken, a pleasant texture or mouthfeel when eaten, and a higher melting point, meaning it won’t melt to the touch of your fingers.
Each crystal level has its own melting point. Only one of these crystals (Beta-5) possesses the desired properties, such as a great glossy sheen, a sharp snap when broken, a pleasing texture or mouthfeel when eaten, and a higher melting point, which means it will not melt to the touch of your fingertips.
We can encourage the formation of this type of crystal through a process called tempering.
To summarize, tempering basically consists of heating chocolate, cooling it down, and then raising its temperature again.
After you’re done refining and conching your chocolate, let it set at room temperature. Don’t worry if you notice a grainy texture and a lighter color bloom. That’s completely normal and characteristic of a different cocoa butter crystal stage. Whenever you see this, it means that chocolate hasn’t been tempered (or tempered properly).
In a bowl, temper the chocolate by melting it to anywhere between 113ºF-122ºF (45ºC-50ºC) using the bain-marie technique, and don’t forget to stir constantly, taking care not to incorporate air into the melted chocolate. Then take the bowl out of the heat source and let it cool down to somewhere between 77ºF-79ºF (25ºC-28ºC) but without stopping stirring. Then, heat the chocolate again up to 88ºF-90ºF (31ºC-32ºC), and take the chocolate off the heat once this temperature is reached.
Alternatively, you can use the “seeding” method. With this method, chocolate that has already been tempered is chopped and added to “seed” the melted chocolate. Stable beta-5 crystals develop in the melted chocolate due to the stable crystals in the chopped chocolate. Stirring is critical in order to retain the tiniest beta crystals in suspension.
The chocolate must then be cooled to 88° to 90°F (27°C) while constantly stirring. If there are any bits of chocolate left in your dish at that temperature, gently reheat it to melt the remaining chunks.
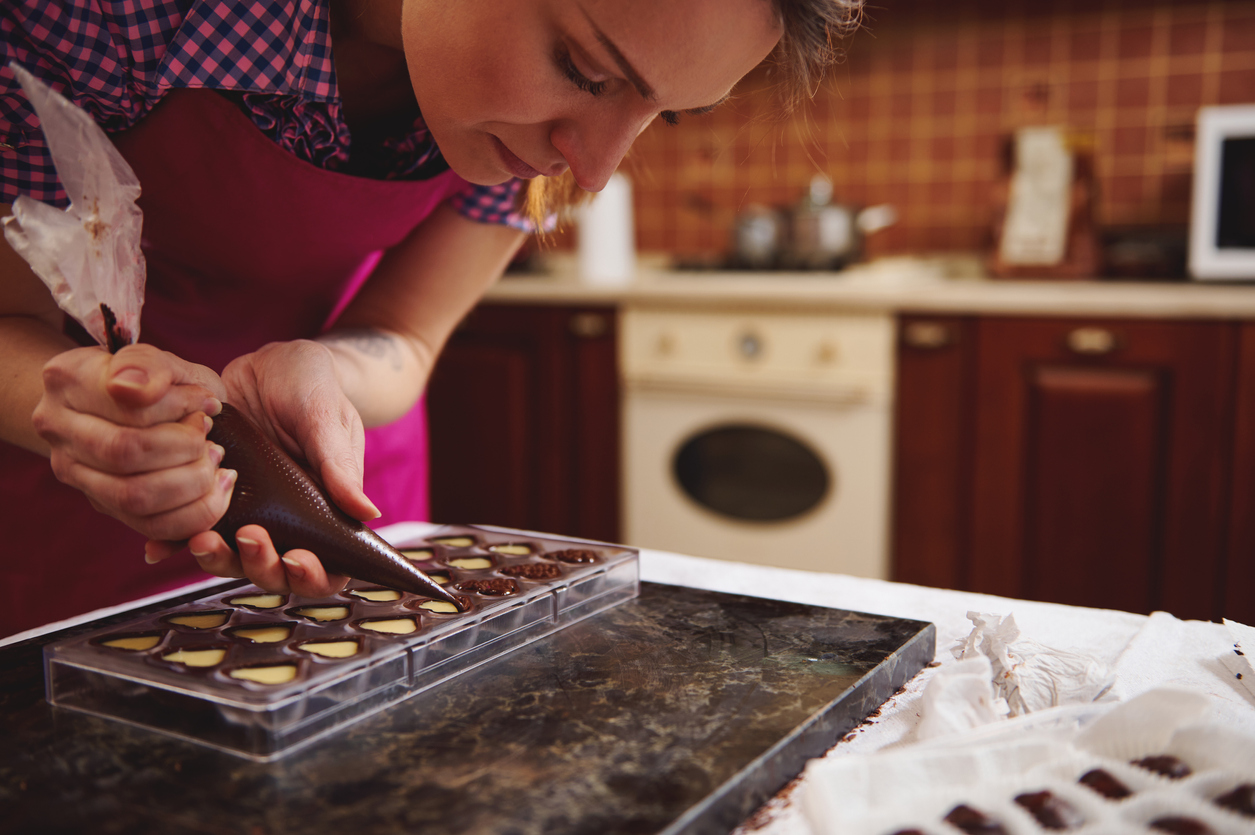
Molding
Right after tempering, pour your chocolate into molds and let it cool completely at room temperature. Once it’s cool, it’s time to unmold, pack, and store your decadent final product before making treats like handmade truffles, bonbons or chocolate ganache.
Save some chocolate bars for the seeding tempering method for future batches.
Equipment needed
Basic chocolate-making can be simple. When considering a chocolate-making business, you’ll need some essential tools:
- Fermentation bins with a lid – Fermenting is essential to chocolate processing, helping to tame bitterness and enhance natural flavors. Ferment your cacao beans in any heat-safe container with a non-airtight lid.
- Cotton cloths – Use these along the way for drying your beans and general cleanup.
- Trays or palm leaf mats – The drying process helps prevent mold when your beans are stored and provides time for more chemical reactions to bring out that level of chocolatey flavor. Trays or mats for drying let you spread your beans out in a single layer.
- Framed mesh sheets – An old window screen is perfect for sifting through your cacao beans, allowing you to separate pieces of pulp or debris before roasting.
- A wet grinder machine or a conching/chocolate refining machine – This is an investment for home chocolate businesses, but it’s critical to producing quality chocolate.
- Thermometer – You will need this tool for several stages of the process. A laser thermometer is a good option to keep hands clean.
- Home-use sous vide machine and bags – Sous vide, or water baths, allow you to keep your chocolate at a specific temperature for a prolonged time without constant monitoring.
- Extension cords – As you move through the steps to make chocolate, it can be handy to have extension cords nearby to spread yourself out.
- Marble, granite, or stainless steel countertop – Any material that stays cool is helpful when working with chocolate – bonus points for being easy to clean.
- Bowl & scraper
- A set of spatulas
- A zester
- Molds
- Refrigerator
Define your processing stations’ areas
Making luscious chocolate creations to rival any baker takes several steps, so it’s best to plan out which areas to use in your home. This way, the process will be as smooth as your final product.
- Fermenting station – Fermentation is best done in a well-ventilated place, like your kitchen, or somewhere out of the way, like a garage, an attic, or a basement.
- Drying station – Drying can be done anywhere with adequate airflow and heat. Your backyard, shed, patio, deck, and kitchen are great places. You can also use a dehydrator or ventilated very low-temperature oven for the last part of the drying stage.
- Roasting station – Your kitchen oven or an outdoor gas grill oven are the perfect places to roast your cacao beans.
- De-husking station – De-husking can be a bit messy, so consider setting up outdoors. If that’s not possible, spread out a sheet or drop cloth to clean up easily.
- Grinding/conching station – Setting up your conching/grinding station on your kitchen counter lets you keep a close eye on this step.
- Tempering station – Unless you set up a portable burner or hotplate, you’ll likely be tempering in your kitchen. A hotplate can be a great option if your work area doesn’t have a stovetop.
- Tabling – A kitchen island is excellent for tabling your chocolate creations.
- Seeding – Seeding your chocolate is done in the same place as tempering – either in your kitchen or a portable hotplate.
- Sous vide – Plug in your sous vide machine, and you’re off to the races.
- Molding and demolding station – For ease of cleanup, de-mold over your kitchen sink or trays that can be quickly cleaned.
- Cooling station – During the first cooling stage, you’ll need to have room-temperature space. If your chocolate cools too quickly, air bubbles can become trapped, resulting in holes.
- Packing station – Kitchen tables are the perfect place for packing chocolate. Clear off your centerpiece, put down parchment paper, and lovingly pack your creations.
- Storage/chocolate cellar – Once it’s cooled, chocolate should be stored in a place colder than room temperature but not as cold as your fridge, like a basement, garage, or cold storage room.
BONUS: Download your free Mexican Hot Chocolate Recipe
Chocolate will always be in demand, so becoming a chocolatier could be a sweet gig for you. Follow these tips to start your own chocolate business at home, and you’ll be poised for success. For additional resources, check out Craft Chocolate’s Youtube channel or the Bean to Bar playlist.


