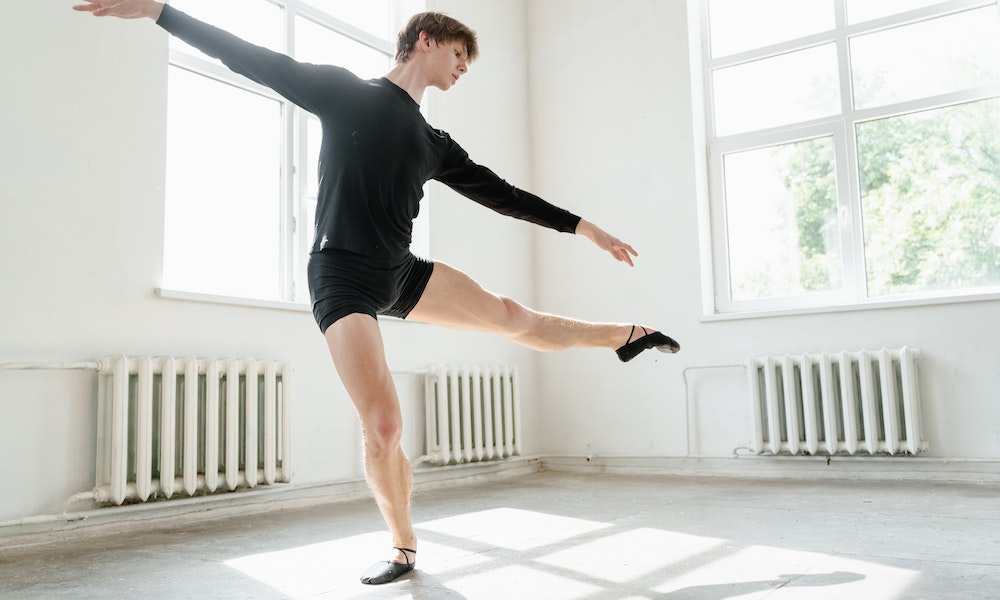
Art can be expressed in many ways. And what art expresses emotions with one’s own body better than dancing? I know a handful of people passionate about dancing, and they all have one thing in common: they’re always thinking about when it will be the time for their next dance. From children to elders, from amateurs to professionals, from hip-hop to ballet, dancing is such a colorful and broad spectrum that welcomes everyone.
At Porch, we care about what you care about; we know many of you enjoy dancing either as a form of art or as a way of exercising (or both!). That’s why we went out there and sought experts who could share their opinions and advice on how an area at home can be turned into a dance practice area (aka dance studio). This is what they told us:
Could you please provide some general tips for setting up a Ballet Studio at home?
A home dance studio should be your place to both exercise and express yourself. As a dancer, I love having a dedicated clutter-free room to put my music on, move, stretch and sweat. My passion turned into my business when myself and business partner Flik Swan launched our online ballet fitness business, Sleek Technique 10 years ago. Back then, my first home studio was a converted bedroom 10ft by 10ft which was perfect for me. Enough space for a 6ft ballet barre, ample room to lay out an exercise mat and fully extend your limbs, even enough space to exercise with a friend if you wanted to.
Victoria Marr
Director and Co-founder
Sleek Technique
What features should my Home Dance Studio have to allow for Lyra/Hoops and Silks/Hammocks practice?
Take the home fitness craze to new heights! You might have recently fed your curiosity for lyra (hoops) or silks (hammocks), or you might already be an awe-inspiring aerialist, known for your Circque du Soleil style party tricks.
Regardless, you’re here because you want to know how to install the equipment required to hang your air-lifted apparatus. Rigging for hoops (for lyra) and ribbons (for silks and hammocks) are largely dependent on your roofing structure and space, so let’s go through those here.
1. Structural Rigging Points: Steel or wooden beams that hold up your home are ideal for aerial rigging. Rule of thumb – if they can support your home, they can support you. (NOTE: Decorative beams, trees and pull up bars don’t count as “structural”, so steer clear from setting yourself up these, no matter how tempting! When in doubt, ask a professional to ensure your set up is safe and sturdy.)
2. Ample Space: If your home doesn’t come with structural beams, having ample space will also allow you to set up a portable rig. A portable rig from a trusted store will give you the same home aerial experience as a structural beam. You also have to make way for those flips and transitions! A recommended 5-6ft for movement in all directions, plus a 9ft height is ideal for you to work your magic.
Finally, make sure you incorporate regular lyra/silks classes into your repertoire, so that you get the coaching to match your investment and results!
The Pole Room is all about inspiring individuals to live their best life through Pole Dancing and Aerial Arts. With 4 studio locations across Victoria and an online Pole & Aerials Online Store, they are passionate about.
Felisha Mendoza
Tha Pole Room
Which type of floor would you recommend for a home dance studio and why?
The type of floor you choose for your home dance studio primarily depends on the type of dancing you do, but in general, you want something that is smooth, durable, and offers a natural spring. As dancers, we push our bodies to the maximum limits, and the floor we dance on has to be able to support us without wearing out. You also want a flooring that has an appropriate balance between slip and grip, meaning you can execute turns unhindered but without losing control.
The two most popular types of flooring for dance are marley and hardwood. Marley is popular for dance styles such as ballet, jazz and contemporary, and is made of a thin vinyl material that can be rolled out over another surface. At home, marley can be installed over existing flooring, which is a great alternative to a more involved renovation project. Be sure to do your research and install the proper subflooring between your existing flooring and your marley mat. Marley provides the surface to dance on, but is too thin to provide the necessary support on its own.
Hardwood is great for nearly any dance style and is my personal choice for a dance floor because my background is in ballroom dancing. The suede-soled shoes worn for ballroom work beautifully with a hardwood floor to provide the right balance between slip and grip. If you don’t already have hardwood floors at home, you can purchase a portable wood dance floor. These portable dance floors come in a variety of sizes and include the necessary subflooring.
I’d be remiss if I didn’t also share what you don’t want in a dance floor. Avoid stone or concrete because this type of surface offers zero shock absorption. The impact of every hop, jump or leap is entirely absorbed by your body, which can lead to a multitude of injuries that will at best make dancing a painful experience and at worst, force you to give up your dancing passion altogether.
At the end of the day, don’t let flooring hold you back from dance! Our bodies are meant to move and moving to music can bring us great joy. A little consideration and planning for our home dance space, however, can help ensure we dance for many years into the future.
Katie a.k.a. The Girl with the Tree Tattoo
What safety features would a home Pole Studio require and why?
It’s extremely important to consider safety when installing a dance pole at home. Here are important safety features for you to consider when setting up your pole dancing pole at home:
1. Make sure the ceiling is strong enough to support the weight of the pole and any individuals using it.
Most of the modern dance poles are held in place using pressure and do not require drilling or anchoring into the ceiling.
This type of portable pole dancing pole should always be installed directly below a ceiling joist, which is the most stable part of the ceiling.
However, you may have a freestanding dance pole instead which has a large, heavy base to anchor the pole. This type of pole is better suited to use in rooms with higher ceilings or if you require a truly portable pole that can be used anywhere (indoors and outdoors)
2. Always Install your pole on a solid, level surface to ensure that it is stable and secure.
Your pole should be installed on a surface that’s completely level for optimal stability. If your surface is not level, you may find it difficult to install the pole completely straight, which is frustrating as a dancer.
3. Make sure the pole is tightened securely and check it regularly to ensure that it is still secure.
Before each workout you should check the stability of your pole and inspect any joints or connecting pieces for signs they may need tightening up.
Not all dance poles need mounting hardware, but if yours does, then only use hardware that is specifically rated for pole dancing, climbing or aerial sport. Any other hardware may not be strong enough to support your full body weight.
4. Only use the pole for its intended purpose and do not allow anyone to use the pole who is not properly trained or experienced.
It’s common if visitors to your home want to try out your pole dancing pole, but you should be extremely cautious about this if they’re not experienced.
Untrained people swinging around a pole is exactly how injuries and other damages happen!
5. Use a crash mat or other padding underneath the pole to provide a cushion in case of falls.
Learning new pole dancing tricks can be dangerous, so a round crash mat is advisable. You can get foldable round crash mats specifically designed for pole dancing.
The good news is that pole dancing mats fold away when you’re not using them so they’re easy to store at home and don’t take up too much space.
You should also make sure that you wear appropriate clothing and always warm-up before using your pole at home.
SarahPole Fit Freedom
What features would you recommend in a Home Dance Studio for proper organization and items/props storage?
For many dance forms, successful practice is deliberate, focused, and frequent, so creating a home dance studio that allows for quick, easy, distraction free use is key.
Let’s build from the ground up. Depending on your dance form, you’ll have different floor needs. For example for tap, flamenco, or other percussive dance forms if you don’t have a hardwood floor that you’re ok getting marked up, you’ll need an appropriate practice floor. Whatever your floor surface, keep the majority of it clear, clean, and ready to dance.
You’ll probably need additional items for your practice, whether it’s therapy bands for conditioning, specialty shoes for your form, a music player, space for a screen for instructional videos or zoom classes, etc. I like to use shelf with baskets on it for storing items off the floor, but with easy access. Besides, many baskets are quite beautiful, come in a range of useful sizes, and help add to a welcoming and inviting space. A tall shelf allows for a video screen to be placed more at eye level and shoes and other floor specific items to be down low where they’ll be needed. Using a shelf also makes more wall space available for mirrors if you have them.
Speaking of mirrors, they can be a very helpful tool, but can also quickly form poor habits, so setting up your space so that you can face away from the mirrors or cover them with curtains once in a while can help you keep your practice more fully embodied and avoid mirror fixation.
There is no one right way to create a home studio – the most important features are that it is a welcoming space that you want to spend time in, but that it also allows for distraction-free focus. Use your creativity! Play around with how things are arranged and stored until you find what works.
Happy practicing!
What are the most desired features for a ballet dance floor?
There are a variety of options for a floor in your home dance studio. The obvious “don’t go there” choices would include concrete, linoleum and tile. While it’s easy to assume, “Oh, wood, of course,” bear in mind that all wood floors are not created equal. If the wood is worn or highly polished, you run the risk of slipping. This, you want to avoid; you want your muscles to be focusing on the dance challenges, not the “I might slip” challenges. And wood laid over concrete is as bad on the knees as concrete is.
The best option is to dance on a sprung floor. This is what you’ll find in the best ballet studios. Instead of just plywood subflooring, like with your average wooden floor, a sprung floor has dual-density elastic polymer (or possibly just foam) blocks beneath, which allows the floor to give, just a little, when the dancer jumps up and down. They are wonderful for the knees, ankles, lower back and, simply put, heaven to dance on. They are attractive and, best news: easy to install.
Got wall-to-wall carpet in your home? No problem! You can simply buy and install interlocking flooring tiles and the carpet itself becomes the shock absorber (although you might need a sheet of plywood below the flooring if your carpet is plush). This can be a great option for a professional looking floor that can be removed and reinstalled as fits the need of your household.
You may have seen dance floors in studios have a smooth black surface, which is a “marley floor.” (While Marley is a registered trademark, it has become a generic term for a black, vinyl, roll-out dance surface.) It’s non-skid, non-reflective, and you’ll see it on professional stages around the world. But a marley surface on concrete or linoleum will still jar the knees, the bones. Save that marley floor for a too-slick wooden floor (or, better yet, a sprung floor), and you’ll be dancing like the professionals!
Terez Rose
The Classical Girl
What pieces of furniture would you consider essential for a home dance studio, and why?
For the most part, you will want your home studio free and clear from furniture and anything that would impede your ability to move around without bumping in to something! That said, there are a few furniture pieces that can make a home studio space feel more welcoming and professional.
A dance educator of 25 years and founder of Dancer 360, my work is all about helping Dancers develop strong bodies and minds. I use my home studio for filming classes for my YouTube channel and my online courses. I also use my home studio to train Dancers (cross training is essential to prevent injury) and give private technique lessons.
My home studio is built into my garage and is complete with a sprung floor, mirrors and barre. That said, it IS in my garage and I want my clients to have an inviting experience for their lessons with me.
For this reason I have the following pieces of furniture just off the studio floor space:
- A bench: this give the Dancer a space to sit to take on and off shoes and a place to rest after class while we recap the lesson.
- A small chest of drawers: I keep items in here such as clean and neatly rolled sweat towels (so they feel like they are at a spa or gym), tissues, extra hair ties, stretch bands, band-aids and more.
- Two small accent tables: one where I keep my portable speaker and the other that I use to place my selfie ring light – this is handy if I want to video a Dancer in class or record an online course or YouTube episode. Both of these tables are light and easy to move out of the way and small so that they can be stashed over in a corner without taking up studio floor space.
While none of these items are mandatory to set up your home studio space, they do provide function and make the space feel more like a real studio. Happy Dancing!
Gina McFadden
Founder and CEO
Dancer 360


